Saturday, April 30, 2011

Flourishes Timeless Tuesday Challenge

I was able to play along in the Flourishes Timeless Tuesday Challenge this week. Here is the sketch:


I needed to make another Mother's Day card so that is what I made with this weeks sketch.

And here it is:


I decided to go with a 6x6 card which I rarely use but I couldn't get what I wanted on an A2 card which is what I the size I use most.


I used an aqua blue mat and inked it with Vintage Photo distress ink. Next layer was made with a round 6" Fiskars border punch which I have had forever and this was my first time using it. Yeah! I cut a smaller circle in a lighter pink and inked it with Vintage Photo. I had the Papertrey Ink die cut border in white cardstock leftover from a previous project and decided to use it.

I stamped my sentiment on white cardstock in Vintage Photo distress ink using Stephanie Bernards Stamps of Life and the crown is a Technique Tuesday stamp. I added pearls to the crown. I backed it on dark pink cardstock and inked the edges with Vintage Photo. The crochet flower is a purchase I made from an Etsy shop called Annie Designs. She has some beautiful crochet flowers in her shop. This card is for my MIL who loves to crochet so I thought she would like the crochet flower. I added some pearls to the middle of the flower and the leaves were made from a sizzix die that I embossed with the Swiss Dots embossing folder from Cuttlebug.
Here is the inside:


I used Hero Arts stamps and Vintage Photo distress ink. I stamped all three stamps at once by lining the stamps up the way I wanted on the card and then layed an acrylic block large enough to fit all the stamps on top and pressed. Then all I had to do was ink it and stamp once.
And that is my card.
Hope you enjoyed it and maybe learned something new.


Friday, April 29, 2011

Vintage Paper Flowers

Added another item to my Etsy shop today! A set of seven vintage paper flowers:
They look so pretty all nestled together. They are made from pages of a vintage dictionary and measure 2". I used two different flower punches and punched six layers from each punch for a total of 12 layers for each flower. I then inked each layer of the vintage paper with distress inks.
Here is a close up of the flower inked with Spiced Marmalade:
Here is a close up of the flower inked with Walnut Stain:

And here is a close up of the flower inked with Broken China:
I used pearls or gems for the centers of the flowers.
I also used Peeled Paint, Fired Brick, Tumbled Glass, and Scattered Straw distress inks. I loved how the flowers turned out and it was fun matching up gems and pearls for the centers. In fact I have a few more colors of distress inks that I could make another set of flowers. It was fun to see how each color turned the vintage paper into a pretty flower.
If your are interested in this set of vintage flowers you can visit my etsy shop at:
http://www.etsy.com/shop/jenneresa
My favorite is the Broken China with the pearl center. What color flower is your favorite?

Thursday, April 28, 2011

Banners for You

I have a new item in my Etsy shop: Banners. They are die cut out of white cardstock and can be used on cards, scrapbook pages or would be a great little gift for a anyone that scraps or makes cards.


The large banner measures approximately 5"x1/2" and the small banner is approximately 31/4" x 1/2".


Each set comes with 32 banners. Sixteen large and sixteen small banners.


Here is a card that I used the large banner on.


And here is a card with the small banner. The cards are A2 size (51/2" x 4 1/4").


You can find my Etsy shop here: http://www.etsy/shop/jenneresa Take a look around and while your in Etsy visit some other shops. You can find all kinds of wonderful things there.
I hope to get more cards and other embellishments up in my shop soon. In fact the cards here are something I have been working on. I plan on making them a set of six, 3 designs, 2 of each and they will come with tags. I just need to get them done.


Monday, April 18, 2011

A Sweet Bunny

Edited: I just so happened to make tissue paper flowers for some of my Easter cards and couldn't resist playing along in the Tissue Paper Magic Challenge in the Moxie Fab World and I have a story to tell about the tissue flower.
I sent my daughter, who is away at college, one of these cards for Easter. I called her to ask if she had gotten her Easter package. She told me she had and that the tissue flower looked so real that she had to smell it just to make sure it wasn't. :)

I made a second Easter card using my favorite bunny stamp. I just think he is adorable and I like putting things under his paw so it looks like he is carrying something. In this case, a carrot:
Here is the card:
I used Creative Memories Custom Cutting System to cut out the large egg and the small egg shape in the middle of the large egg. I embossed and inked the outside and inside edges of the egg and punched a double loop border with a Martha Stewart border punch. The flowers are made out of pink and white tissue paper and inked the edges with Vintage Photo and Peeled Paint distress ink. I used 3 sizes of Papertrey Ink dies to cut out the flowers. There are fifteen layers of tissue paper for each flower layer and are held together with a brad. I seperated each layer and crumpled the tissue paper up towards the brad. I decided that the petals needed more ink so I gently brushed the ink pad over the entire flower and I think they look like carnations.
I stamped Happy Easter on the inside so it would peak out of the small egg cut out and added some pearls to the sentiment.

 Green ribbon is wrapped around the base of the green pattern paper. My sweet little bunny is stamped with Vintage Photo distress ink on white cardstock and is colored with Antique Linen distress ink. The carrot he is holding is stamped on water color paper with Vintage Photo ink and clear embossed. I then used watercolor pencils to color the carrot and cut it out. I made a slit along the bunnies arm and slid the carrot underneath.

  I was really pleased with the way the card turned out. Very spring like and a little bit on the shabby chic side which I love the look but find very hard to do.

Wishing everyone a very happy Easter and spring!


Tuesday, April 12, 2011

Colorful Little Guy

It turned out to be another sunny day today! Unbelievable that we have had two days of sun. Of course we have had rain but not during the day.
I spent almost the whole day out in the garden and it is really starting to look nice. As I was cleaning up leaves and pulling weeds I found this guy:

I ran into the house to grab my camera hoping he would still be there when I got back. I snapped all the pictures I wanted and he just sat there the entire time. I filled my bucket and he was still sitting in the same spot. I went and emptied my bucket and when I came back he was gone. I looked and looked but I couldn't find him anywhere.
In the 12 years that I have lived here I have never ran across one of these before.
Does anyone know what he is? I'll see if I can find him in one of my books.


Saturday, April 9, 2011

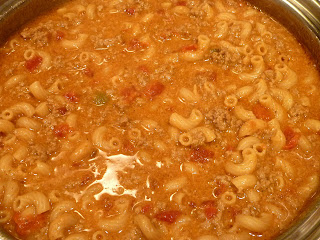
Cheeseburger Macaroni

Found this recipe on http://www.kevinandamanda.com/ . This recipe reminded me of the Hamburger Helper version but much healthier and almost as quick.

1 lb lean hamburger meat
1 pkg taco seasoning
1 can Rotel tomatoes and green chilies ( or petite diced tomatoes)
2 cups beef broth (or water)
1 cup elbow macaroni

Meat Mixture

Brown and drain hamburger meat. Stir in taco seasoning, Rotel, beef broth, and macaroni. Heat to boiling. Reduce heat and cover pan. Simmer 12-14 min or until macaroni is tender.

Meanwhile, make the cheese sauce:

3 tablespoons butter
2 tablespoons flour
3/4 cup milk
1 cup shredded cheddar cheese
1/2 tsp salt
1/2 tsp pepper

Cheese Sauce Mixture

Melt butter in a saucepan. Whisk in the flour and cook, whisking for 5 min until fragrant and light brown in color. Whisk in the milk and bring to a boil. Whisk until smooth and thickened. Remove from heat and stir in the shredded cheese  until melted. Add the salt and pepper to the cheese sauce. Pour the cheese sauce over the hamburger mixture. Stir gently to combine.
Serves 4

Cheeseburger Macaroni

The first time I made it I followed the recipe except I used whole wheat flour assuming they used all purpose flour. It was good but just a tad too spicy hot for my mild palate. The second time I made a few changes: 
1) I used ground turkey instead of hamburger
2) Used a can of diced tomatoes with green chilies instead of the Rotel to make it a little more mild and  
3) Used whole wheat macaroni.
It came out great. It was a bit less hot and it was even healthier with the whole wheat macaroni and turkey.


Thursday, April 7, 2011

Dead or Alive

Last fall while I was pruning I was tired of my butterfly bush being in the way of the path even when I prune it each year. So I really cut it back. Waaay back!
This is what I saw this spring:

Oops! Maybe I killed it. I was feeling sad as I really loved my butterfly bush. But on closer inspection I saw this:

Yeah, signs of new growth! I'm sure it will be ok now and grow back even fuller than before. But we will be needing some warmer weather and sunshine for anything to grow around here.

Spring please hurry up!! 


Wednesday, April 6, 2011

It's Here Again...

the rain has returned. I knew the sunshine wouldn't last too long so I was up bright and early this morning and headed out to do some more weeding. Sure enough after  an hour later I noticed the sky was no longer blue but grey with dark clouds.

I still had quite a bit I wanted to get done so I hurried along and filled this 5 gallon bucket 18 times to finish the job without getting wet.


If you find a lot of these guys crawling around in your yard or garden that means you have healthy soil. I guess ours is pretty healthy because I see lots of them.


The sun did come back and it sprinkled a bit then the skies clouded back up. I went to the post office and it started raining. By the time I got to Safeway it was snowing. When I came out it was raining. The temperature dipped and the wind came up so it was back to winter again. So much for washing the car today.


Rain, rain go away. Come again another day!


Hope you are enjoying spring where ever you are!

Tuesday, April 5, 2011

Great Therapy Session...

...out in my garden today! Four hours of sunshine and pulling weeds can do wonders for a persons soul. Although I still have many hours of work ahead of me I made a pretty good dent in the biggest of my flower gardens. It also has the most weeds every spring for some reason. There are also lots of pine cones, needles and small branches that have to be raked up before I can weed. Did you know that a pine tree sheds 1/3 of its needles? And they all fall in my flower garden or so it seems.
I did find a few signs of spring:
These mini daffodils have bloomed every year we have been here. Don't daffodils just make you smile? 
The purple plant is heather I believe. This poor plant hasn't done very well in the garden and have thought on moving it somewhere else but it looks really good this spring. So maybe I will leave it alone and see how is it does this year.

I am hoping for a couple more days of dry weather so I can at least get the back garden done. In Feb. I did get my hydrangeas trimmed and the flower beds along the front of the house cleaned up and weeded so the front can wait a bit longer.

What are your favorite spring flowers?

Tuesday, March 29, 2011

Photography Tips

I have been trying to improve my photography skills and I thought I would share what  little I have learned. I can't stress how important it is to use natural light. Natural light will greatly improve your photos. I took this photo of my vintage Easter card by a window on a rare sunny day. It turned out so much better then my first attempts when the light was not as strong.

Also use some imagination when it comes to props. The first time I had a white background, and some pink and white flowers sprinkled around. Although it sounded nice it just didn't do much for the card and was boring. The second time (photo above) I used a bible to set the card on and just used the curtain for the background and it turned out much more interesting.
When shooting closeups use your timer. While manually pushing the shutter button can some times cause the camera to shake. You will get a clearer picture using the timer. Or you can use a tripod. I just find that most of the time when I am shooting indoors I don't have room for the tripod. I have been known to use a stack of books to provide the right height and flat stable surface to get a shot without going to the trouble of setting up a tripod.

The paper doily on this Easter card was sprayed with glimmer mist which just gives a shimmer of sparkle and is very hard to catch with a camera or at least with mine. I just have a digital point and shoot. I had to place it in a spot that had sunlight but not too much and I just kept turning the card to different positions until I got it right. Also I used the macro setting on my camera to get in close.

I still have lots more to learn but feel I have already improved my photos greatly just from these few small things. Sometimes it's not the big things that make all the difference but the little things.

What are some tips that you have found that improved the quality of your photos?

Thursday, March 24, 2011

Graduation 2005

I have a confession to make. I am just now getting around to scrapbooking my sons high school graduation. Now you may be wondering what is wrong with that? I know many times it is years before we scrapbook events or photos that are near and dear to our hearts and that is not the confession or why I feel bad. It's not that he graduated in 2005. Here  is my confession: it is that our daughter just graduated in 2010 and not only did I have her graduation photos documented and safely in a scrapbook but her entire high school years are done as well.

And here is what I believe to be why: (I have just learned something about myself.) I find that I quickly become bored doing masculine pages and can do all the frilly girly pages I want and never get tired of using flowers, ribbons, glitter and all other kinds of bling.

I had actually started an album for my sons graduation and had the photos printed, paper & stickers picked out but that was as far as it got and has been sitting forgotten all these years.

So now I am on a mission to at least finish his graduation and start his high school years. So far I have 2 pages done:

I still have two more pages to do before I will be finished but I want to edit some of the photos I had already printed a little differently and find some of the memorabilia I want to include in the layout.
This page is after he graduated and we took pictures with family and friends. I really liked the template I used to design the page. I used two of the photo spaces for journaling and one for embellishments. I found it hard to come up with embellishments. I used stamps and embossed them, cut them out and adhered some of them with foam adhesive to give some dimension. I used CM Vellum Expressions (the word Son) and a frame also using foam adhesive. I cut a 12" border sticker into four 3" sections and used them under some of the photos. I typed the names of family and friends on pattern paper and put them under the remaining photos.
This page was the party we had for our son and friend. Again I used a template to lay out the photos and just added a border punch that I repeated three times in different colors. Letter stickers were used for the title and a few other stickers were used to embellish a little more. It's not an elaborate page but its done and that is what it's all about.

So leave me a comment and tell me if you have a hard time doing masculine pages too. I would like to know that I am not alone.


Monday, March 21, 2011

First Scrapbook Page in Six Months

I finally sat down and did a couple of layouts last week. Yeah! It has been six months since I last scrapbooked. It felt so good to get some pages done.
This first 2 page layout are from 2007 and have been on my mind ever since we took the hike. I had the photos developed but just never got around to getting them scraped for one reason or another. I feel good knowing that they are safely in an album.
Here is the layout:

Click on photo to make it larger.

I didn't scrap all the photos and they aren't any stellar photos either. I just remember how it was a beautiful winter day and we decided to go on a hike. Just the three of us and Nanook. The scenery was so pretty and the river was running fast.


I don't remember how many miles we walked but it was quite a ways. I didn't spend a lot of time on these photos. I just used a template for the design layout, cut 12" border stickers to fit under four of the photos, stamped the title and date on strips of paper and added three punched snowflakes which I added some glitter glam for a little sparkle and was done.


Beautiful mountains, huge trees and ice cream. A perfect day. Although we almost didn't stop for the ice cream because Amber had a indoor soccer game that night and did not want to be late. But in the end she decided we had time for a quick stop but she kept an eye on the time. Soccer was the one thing that she was always on time for.

Again I used a template for the design. I added some cardstock and pattern paper for the title on the right side. The title was actually a photo of the sign that I just cut out. I made the circle embellishment by punching two circles, inking the lighter circle with vintage photo distress ink and layered the two circles together. I punched out the pine trees and adhered them onto the circle and added it to the page. I had a border of pine trees leftover from something that I had saved and thought it would work nicely on this page. I stamped the word Adventure on the page and cut the pine tree border to fit  and I was done.

I have another two page layout done but will save that for tomorrow.
So what have you been working on? Let me know in the comments.


Sunday, March 20, 2011

Tuesday Trigger: Button, Button


I almost didn't get my card done but here it is just under the wire. You can find this weeks Tuesday Trigger here:
http://www.moxiefabworld.com/2011/03/tuesday-trigger-button-button.html

Here is the inspiration for this week:
Here is what  I came up with for this weeks trigger:

The flower is made from  six 1 1/2" circles that have been folded into thirds. I punched another circle and covered it with double sided tape then layed the six  folded circles on top of the tape side by side. I also used Walnut Stain distress ink along the edges of the circles
Now here is where the Tuesday Trigger comes in. I used a button for the flower's center and used orange floss. I rarely use buttons. I don't know why because I have a jar full of buttons. I think I just am too lazy to get out the floss and needle. But I used a button today. Yeah me!


The library card holder die is from Papertrey Ink and so are the tickets and banner dies and stamps. I stamped the library card holder with Hero Arts Envelope stamp and Tim Holtz Spiced Marmalade Distress Ink. I also used Spiced Marmalade and Walnut Stain ink on the tickets. I felt the card was still missing  something so I added the butterfly with the Martha Stewart butterfly punch and used green/white baker's twine for the butterflies antenna's
I am really happy with the card because I used a new technique (the flower), used a button, which I rarely do and the Hero Art stamp, Papertrey ticket & banner stamps and dies have not been used yet. It always makes me happy when I use something new or something old that has been collecting dust for a while.

If you stop by please leave a comment. I would love to hear from you.

Wednesday, March 9, 2011

St. Patrick's Day Card Kits

Here are the cards I made for St. Patrick's Day:

Each card is a different shade of green and I had so much fun making them that I made up a few extras as card kits. Each kit makes six cards.
You can purchase a kit or card at my Etsy shop, Jenneresa:
Here  is what each kit looks like:
This is for the outside of the card

Everything is already pre-cut, hand stamped and punched. There are six different shades of green which you can mix or match however you would like. All you will need for supplies is an adhesive of your choice. I prefer to use double sided tape. 

This is for the inside of the card.
Again there are six different shades of green to mix or match as you would like.

The inside of the card will look like this.

Also included in the kit are six white card bases and six envelopes.

Here is a card with an envelope.
The envelope has a shamrock flourish hand stamped in the lower left corner.

This is how the kit is packaged

It comes in one large glassine bag tied shut with green and white baker's twine, hand stamped and a tag attached that includes my contact information on the back. Inside the large bag you will find the larger pieces of cardstock and the gold metallic thread and a smaller glassine bag (shown to the right of the larger glassine bag in photo above) that contains all the smaller pieces of the kit. It is also tied with the green and white baker's twine and hand stamped.

Directions to put the outside of the card together:
  • Take two of the gold metallic strands of thread and lay them along the bottom edge just above the white the scalloped border of the white cardstock piece wrapping the edges around to the backside of the cardstock and securing with double-sided tape.
  • Adhere the white cardstock mat with the scalloped edge to the larger green cardstock mat leaving more space at the bottom and the sides and top spaced evenly. 
  • Adhere the gold square to the small scalloped square.
  • Adhere the white plain square to the gold square and adhere a shamrock to the white square on the diagonal.
  • Take the layered square you just made and turn it on the diagonal and adhere it to the front of the white cardstock mat with the scalloped border, centering it between the top of the card and the sentiment.
  • Adhere the finished card top to the front of a card base making sure that the fold of the card base is on the left side.
Directions for the inside of the card:
  • Take the white square with the sentiment on it and adhere it to the center of a large scalloped green square.
  • Adhere the large scalloped green square to the inside of the card centering it from side to side and more towards the upper top half of the card or wherever you would like it to be. And you are done.
I hope you enjoy making these cards as much as I did. If you have any questions please use the contact information on the tag and I will be more then happy to help.