My stamps and dies I ordered from Verve Stamps came to day!! Yippee! I can't wait to use these new stamps! I don't know about you but I think it is more fun to order crafty supplies and then wait for them to come in the mail. I just love getting packages in the mail.
Any how I thought I would share them with you all.
The first two stamp sets are "Strong Anchor" and "Dad's Day". The Strong Anchor set comes with a die for the anchor and ships wheel.
The other stamps set is "Notes of Prayer" The dies are a pair of crosses and they have matching cross stamps.
I really love Verve Stamps! They are made in the USA and so are they dies. I haven't used the dies yet but the stamps are very high quality and cling well to the acrylic block. This is only my second order but they have been a great online company. The order arrives quickly with no problems and the stamps and dies are packaged securely. Today is the last day of their sale so hurry on over to Verve Stamps and check them out!
Another fun thing Verve does is they send you a free stamp as a thank you for ordering. I have only ordered twice from them and have gotten a different stamp each time. I don't know if you have to order a certain amount or not. I just know I have gotten a free stamp with both orders. Here is the sweet little surprise I received with this order:
They also have free shipping on orders of $50 or more.
Happy Friday!
Teresa
Thursday, May 30, 2013
A True Classic
I realized today that Father's Day is not far away and my Dad's birthday will be coming shortly after. So with that in mind as I sat down to create a card I pulled out the stamp set Twist and Shout from Fiskars. It has a 50's theme but today it was the old car I was interested in.
I used this sketch from Deconstructed Sketches
As soon as I saw the sketch I thought it was perfect for a masculine card and it was. I am very happy with the way it turned out.
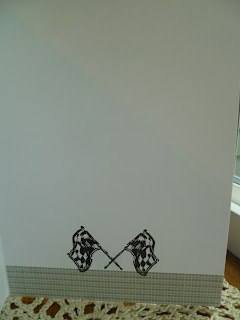
I went with black and white for the color scheme. It just seemed to fit the car theme. I stayed true to the sketch with a few minor exceptions. I moved the banner to the very top of the card, the baker's twine is under the banner and I added a piece of ribbon at the bottom.
Have a wonderful evening!
Teresa
I used this sketch from Deconstructed Sketches
As soon as I saw the sketch I thought it was perfect for a masculine card and it was. I am very happy with the way it turned out.
I went with black and white for the color scheme. It just seemed to fit the car theme. I stayed true to the sketch with a few minor exceptions. I moved the banner to the very top of the card, the baker's twine is under the banner and I added a piece of ribbon at the bottom.
I love baker's twine and bought 12 colors of it a while back. It looks so pretty in the glass pot I keep it in but I just seem to forget about it. So I am making an effort to include a bit of baker's twine in my projects.
Oh, and by the way here is the inside of the card. I am of course going to add a sentiment inside a little later.Teresa
Wednesday, May 29, 2013
Colors to Brighten You Day
It is a gray day here in the Pacific Northwest but I do have a card to put a bright spot in the day. :) I ran across the blog of Colour Q and couldn't resist the colors: Basic Gray, Daffodil Delight, Real Red, Cool Caribbean and White.
I paired the colors up with sketch #88 from Freshly Made Sketches
I paired the colors up with sketch #88 from Freshly Made Sketches
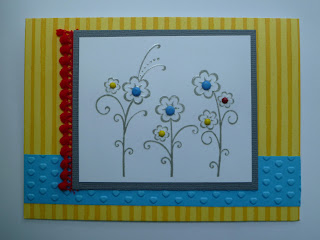
I'm not going to lie, I had a hard time getting started with these colors. After rummaging through my pattern papers I realized I didn't have any with these colors together. So I decided to start with picking out a stamp. I ended up picking a cute flower stamp from Hero Arts. I stamped it with Dove Gray Memento ink then traced over the stamped image with a clear glaze pen so the image is now shiny and almost looks like it has been embossed.
I also tried stamping the flowers on red and yellow cardstock and cutting them out to
add color to the flowers but the gray ink did not stand out on the
colored cardstock and plus the flowers were so small that they did not
look good hand cut. So then I tried coloring the flowers with markers
but I didn't like that either so I just left them plain for the time being and moved on.
I used the gallon, quart and pint method with the colors. Daffodil Delight as the gallon, Cool Caribbean Blue as the quart, and Real Red as the pint. I usually don't pay too much attention to rules but the gallon, quart and pint rule really made things easier on me today.
I matted the white focal image onto a gray mat and added mini red pom pom trim to the left side of the gray mat. Out of the three colors left I thought the gray mat looked best against the yellow and that left the blue for the strip towards the bottom of the card. I dry embossed the blue strip with hearts and then adhered everything together. I did do one last thing to the stamped image before adhering it. I was determined to add some color to the flowers. I finally thought of using mini and teeny tiny brads. The brads were the perfect solution. Now the flowers had color and it helped pull the card all together.
It is a sweet little card and I left it without a sentiment. I think it would make a great get well or birthday card with it's bright and cheery colors.
Wishing you all a bright day!
Teresa
Monday, May 27, 2013
Mojo Monday Birthday
Hello! I just wanted to share my card with you all today:
Not sure if I like how it turned out. I just couldn't decide where I wanted the sentiment to go.
I did a little bit of shopping this morning and found a canvas covered chipboard album, a package of eight 2x2" canvas some distress crackle paint and some pretty green Washi tape.
I couldn't wait to use the tape and one of the square canvases on a card. So I chose to use the Square Mojo Monday Sketch #295. It was perfect for the small square canvas. .
I used a strip of the green washi tape and wrapped a band around the bottom strip of blue paper that I embossed. For the banner I wrapped the one end with green and white baker's twine, added a brad through the center of the small orange flower and tied a small piece of the baker's twine around the back of the brad before adhering it to the banner.
The sweet little wood bird was painted with China Blue and Vintage Photo distress stain. I really like how the stain covers the wood. This was my first time using wood pieces and I have to say it turned out to be really easy.
Here is a peek at the inside of the card. Just cut a piece of white cardstock a bit smaller than the card, covered the bottom with a strip of the washi tape and rounded the four corners.I had fun making this card using new products. Can't wait to use more of the small flat canvases as I have so many ideas floating around in my head.
Teresa
Sunday, May 26, 2013
Beautiful Blooms Thank You
For today's card I used the wonderful sketch #212 from Unscripted Sketches.
What is so nice about this sketch is that you can leave it pretty simple and have a great little card or dress it up as much as you want.
My inspiration to make this card all came from the pretty edged yellow ribbon that I bought yesterday at Jo-Ann's in the dollar section. I don't know about you but I always have to check out that section because I almost always find something I can't live without. Yesterday it was just the roll of yellow ribbon that came home with me. I matched the ribbon with the mat stack Cafe Mediterranean from DCWV.
I used the Papertrey stamp set "Beautiful Blooms II for the flowers and leaves. I used Broken China and Shabby Shutters distress inks to stamp the flowers. I kept adding things to the flowers after I had stamped them instead of just leaving them as they were, which is what I generally do. Instead I added the button and tied it with bakers twine and for the smaller flowers I added yellow pearls. The border strip is wrapped with twine and I roughed up the edges of the strip with my distress tool which I seem to be using on all my cards this week.
Here is a tip for your distress tool:
Mark the sections with #s so you know which ones have been used and are dull and which ones haven't been used and are still sharp. As you can see I haven't used mine all that much as I am still on the first section. But I know that is the section I have been using and will continue to use it until it no longer works before moving on to a different section and numbering it #2. Not a big tip but one that will help you to get a longer use out of your distress tool.
Here is a peek of the inside of the card.
Once again I had a leftover strip of paper. It was a piece of the pretty floral pattern paper and I didn't want to throw it out or store it so I decided to use it on the inside of the card and stamped a flower and leaf to go with it.
Friday, May 24, 2013
Inspiration From My Desk
Here is my scrappy card:
I used this weeks sketch from Retro Sketches #64:
I inked up the die negative with Crushed Olive Distress ink and then inked the inside and outside edges with Walnut Stain before adhering the stamped flora image that I watercolored with distress inks. I used pop up dots to layer the framed image over the background paper and lace ribbon.
The butterfly is stamped on Sticky Back Canvas and painted with distress inks. I then die cut it and adhered it to the frame with pop up dots and added ivory pearls to the butterflies body.
My first thought was to leave the card without a sentiment then decided to use "Wishing You" on the lower right corner that way I still can make it for just about any occasion. I used more ivory pearls to dot the i's in wishing.
I do think I need a break from the colors pink and green lol! I have made three cards this week with that color scheme. I think I need a change.

I wish all of you a very wonderful Memorial weekend!!
Teresa
Thursday, May 23, 2013
Green and Purple Congrats
Another gloomy and cold day today so I was able to spend some time in my craft room this afternoon.
I needed to make a card for a couple at our church and have been thinking it over in my head for the last couple of days; what stamps, sketch, colors, and paper I was going to use for it.
I had the sketch already picked out. It is sketch #102 from The Deconstructed Sketch by Jen Shultz. She always has such wonderful sketches.
I decided the card would look best by turning the card and flipping the sketch a bit.
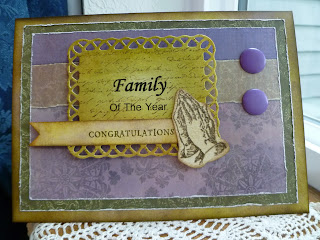
As you can see I picked green, purple and brown for the colors. The praying hands were stamped on watercolor paper that I still had sitting on my desk from my last card session. I then inked it with Antique Linen and hand cut it out.
The background for my the sentiment, which by the way I did on the computer, is also a leftover mistake from my last card. I had stamped the script stamp slightly crooked and couldn't use it. For this card I die cut it with a Spellbinders die and just made sure the die was placed so the script was straight. I also inked the background paper before I die cut it so I wouldn't bend the delicate border. I used Crushed Olive, Forest Moss, Peeled Paint and Walnut Stain distress ink. I then ran it through the printer for the sentiment. "Congratulations" is stamped with Forest Moss distress ink on ivory cardstock then inked with Crushed Olive, Concord Grape and Walnut Stain distress ink.
I also roughed up the paper layers to help give the card an aged look. The two purple over-sized brads are something that I have had for several years so it felt good to use them. I also inked the edges of the white card base with Forest Moss, Concord Grape and Walnut Stain distress ink. Lots of inky goodness on this card!
Teresa
Tuesday, May 21, 2013
Good Day in the Craft Room
It is a gloomy, wet and dreary kind of day here so I spent most of the it creating a couple of cards and spending time on the computer. It's just that kind of day.
It seems like it has been ages since I have joined in on any challenges or sketches so it was great to be able to play along today. I picked this sketch from Mojo Monday.
Here is their sketch for this week:

The lace around the border is from Stamping Up. I layered papers that matched the Victorian Velvet and Peeled Paint inks along with a dark brown cardstock scalloped border that had been left over from another project.
I stamped the Papertrey Ink sentiment with Timber Brown Memento Ink on ivory cardstock and added pink pearls.
Here is my second card that is very similar:
I used the same ink and paper colors except I didn't mist the flowers with perfect pearls.
I used green pearls instead of pink on this card and roughed up and inked the edges of the border.
It seems like it has been ages since I have joined in on any challenges or sketches so it was great to be able to play along today. I picked this sketch from Mojo Monday.
Here is their sketch for this week:

Here is my first card I made:
I used a script background stamp on an ivory card base and Walnut Stain distress ink. I also inked the background with Antique Lace and the edges with Walnut Stain distress inks. I used watercolor paper and Victorian Velvet and Peeled Paint distress ink for the butterfly and flowers and misted the flowers with perfect pearls. I used the inks like watercolors by stamping the ink pads on my craft mat and spritzing a couple of times with water and mixing it with a paint brush. It was such fun painting that I wished I had more stamped images to paint.The lace around the border is from Stamping Up. I layered papers that matched the Victorian Velvet and Peeled Paint inks along with a dark brown cardstock scalloped border that had been left over from another project.
I stamped the Papertrey Ink sentiment with Timber Brown Memento Ink on ivory cardstock and added pink pearls.
Here is my second card that is very similar:
I used the same ink and paper colors except I didn't mist the flowers with perfect pearls.
I used green pearls instead of pink on this card and roughed up and inked the edges of the border.
I also changed the sentiment and inked it with Antique Lace and Walnut Stain.
I really don't have a preference of one over the other. Well except maybe I like the pink pearls more than the green.
What about you? Do you like one card better than the other?
Teresa
Monday, May 20, 2013
A Lovely Sunday Afternoon
Wayne and I had a convention to attend this weekend in the Tri Cities area in Washington. It is also wine country there so before we left on Sunday we stopped at three of the Winery's. The day was sunny and beautiful so we opted to have lunch outside on the patio.
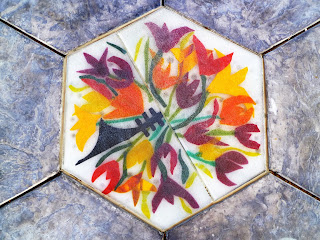
All three winery's were beautiful and unique in different ways. This was in the floor of one of them.
The views were pretty and soothing to the soul. I could have stayed there all day but we had a fairly long drive yet to get home.These were such delicate roses and had a lovely scent.
Teresa
Subscribe to:
Posts (Atom)


