Showing posts with label Thank You. Show all posts

Friday, July 31, 2015

A Set of Four

Good morning! A few post back I shared a card that used a sunburst technique and gave the link to where I found the tutorial. Well, I love the technique so much that I have made a few more cards.
They are similar but slightly different.
This one I used a chipboard flower and inked it with blue and green ink then sprinkled clear embossing powder and melted it with the heat gun. While it was still warm I sprinkled more embossing powder and heated it again.
 I put the focal point in the middle of the card and I had a small piece of the twine leftover that was just long enough to make a small bow.
 I put the sentiment in the middle of the scalloped circle instead of on the right bottom corner of the card.
 I again put the focal point in the center and on this card I inked the edges of the inside mat with dark blue ink.


 This last card is my favorite. I love the chipboard butterfly. I inked the butterfly with blue ink and again sprinkled it with clear embossing powder and used a heat gun to melt the powder. I did it one more time so I had two layers of embossing powder. I then added the big pearls to the body.
I like how the chipboard still shows through in some areas of the butterfly. In real life it is really shiny and looks so much prettier.

I also made a wedding card in black and white using the sunburst. I think it turned out so nice in the black and white pattern paper.

Thanks for dropping by and have a wonderful weekend.

Teresa


Friday, May 30, 2014

Gemstones and Peacock Feathers

Happy Friday to you! The week just flew by and the weekend has started.
I have one last card to share with you for this week. It is a one layer card which I seem to be really getting into lately.
Here is my CAS card:

I was inspired by this sketch:
When I saw first saw the sketch from CAS(E) this Sketch! I knew I wanted to use it. You have plenty of time to play along over there so go ahead and make a card and link it up with the rest of us!
As I browsed through the design teams creations I came across Leigh Penner's  card and was immediately inspired by the feathers and colors she used.
Isn't her card lovely? As I was looking at Leigh's card I knew exactly what stamp I was going to use and what colors of DS inks. It all came together in my head in just seconds. I could hardly wait to pull everything out and get started. 
First I pulled out this stamp set called Gem Stones from Inkadinkado.


I have had this set for years and even though I really like it I just hadn't found a project to use any of the stamps on until now. I pulled off the peacock feather and grabbed some Broken China, Shabby Shutters, and Peacock Feathers DI. These just also happen to be my favorite DI colors.

I wanted to add some sparkle to the feathers and played around with some glitter and Stickles but in the end I used rhinestones that matched the feathers.
The "thank you" sentiment is from a little Studio G set. I really liked the little flourishes around it.
That's it! I think I made this card in twenty minutes or so. I wish all of my cards would come together so easily. Many times I have the idea and picture of what it will look like in my head but what I end up with rarely looks what I had pictured.
 
Thanks so much for dropping by and I wish you all a lovely weekend!
 
Teresa


Thursday, May 22, 2014

I'm Back!!!

Hello my fellow bloggers and crafty friends! Thanks for sticking with me.  It has been such a long time since my last post but I am out of hibernation and ready to share some new cards I have been working on this week.

First up are these two cards: 
 I based these cards off of this Sweet Sunday Sketch Challenge #220 :

I needed two thank you cards and both recipients favorite colors are pink and purple. The first card is pink and I stamped the white card base using Worn Lipstick DI and HA Envelope Pattern stamp.


  For both cards I cut a 2 1/2" strip of pattern paper and die cut a circle just below the top of the strip and adhered it to the card base with foam dots. I die cut the butterfly from pattern paper and wrapped black floss around the body and tied a knot at the top to make the head and antennas then adhered the butterfly with foam dots to the center of the circle.
I think I might add a dot of glue to hold the antennas in place. They tend to get stuck under the wings sometimes.
I die cut the banner then stamped the thank you sentiment with Memento Tuxedo Black ink. After rummaging around in my bling drawer I found these pink metal flowers with holes in the center which I filled with a pearl dot and adhered them to each end of the banner. I glued the banner towards the bottom of the pattern paper strip and was done. 
 
I liked the sketch so much that I made a second card with it:
This  is has both purple and pink. I stamped the Envelope Pattern in Shabby Shutters DI and the butterfly is purple.
I made the same banner except I used some glittery pink flowers with a rhinestone in the center. I think I still have time to enter the Sweet Sunday challenge. It has been months since I have entered any challenges so it will be fun getting back in the groove of things.
I found this card by Joyce over at Atlantic Hearts Sketch Challenge:
I loved that it was only one layer and thought it made a very nice sympathy card and reminded me that I need to start  replenishing my sympathy card stash.
 
Here is how my card turned out:
 The stamp I used was from an old Rubber Stampede called Palm Leaf (I don't even know if they are around any more). I have used this stamp  several times over the years.
I used Shabby Shutters and Mowed Lawn DI for the leaves. On some of the leaves I used both colors, inking the stamp first with the lighter Shabby Shutters than inking over that with the Mowed Lawn. The rest of the leaves are stamped using just the Mowed Lawn. All I had left to do after the palm leaves was to stamp the sentiment in Memento Tuxedo Black ink and add the butterfly. Such a simple card but I love how it looks.
 
I have so much to share from our winter travels I just need to get on the ball and do it. But right now the weather is super nice and I need to attend to my poor neglected flower gardens. They look so shaggy.
 
I'll be back soon I promise!


Monday, July 22, 2013

Thanks So Much

 Hello! Here it is the beginning of another week. Boy, July is just flying by and so is summer.
Today I have something a little different. I'll start by showing my card:
 
 Here is the sketch I used:       
I don't remember how I ran across Sketchbook Saturday Challenge but I always love finding new sketch challenge to try.
Now here is where things are a little different. Friday I bought a new stamp set from My Favorite Things. When I opened the packaging I thought it was too pretty to throw it away.
Here it is: ( I had already cut it apart)
I cut off the decorative ends and then cut the scalloped and strips from the white with the flowers.
I layered the cut strips on gray cardstock and left the middle open which is where I strayed a bit from the sketch. The  "thanks so much" stamp is from Papertrey Ink. I inked the edges of the gray cardstock with Black Soot distress ink.
The layered paper flowers are Creative Memories and a pink brad in the center. I sprayed the entire flower with Perfect Pearls.
 
Here is a close up so you can see the shimmer of the Perfect Pearls.
I added some leaves from my stash to finish off the flower and card.
I was too late with my card to link it up over at Sketchbook Saturday :(  but look forward to playing again.

Have a great week!

Teresa


Sunday, June 23, 2013

You're Too Kind

Good morning!
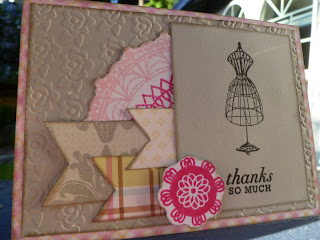
The card I have to share with you this morning was inspired by scraps leftover from this card I made a little while ago:
http://teresazuehls.blogspot.com/2013/06/this-will-be-quick-as-i-need-to-get.html
I had the other half of the doily leftover and a scrap of the embossed gray cardstock.  I didn't use any sketches for this card. I just built the design around the doily which is the focal point of the card.
I matted the doily with the dark pink cardstock to help it stand out more from the background. I added some gray gemstones for a little sparkle.
 I turned the embossed gray cardstock into a banner made a grouping with of banners with it and two shades of pink. I inked all the banners with Pumice Stone distress ink. On the light pink I stamped the sentiment with Dove Gray Memento ink. The background pattern paper is embossed with the Swiss Dot folder.
Enjoy the last day of your weekend!

Teresa

Sunday, June 9, 2013

All Sweetness and Light

This will be quick as I need to get this done in time to meet a deadline. Sorry the photos is so bad. I can't believe that there was too much light to get a good photo.

 I used the Deconstructed Sketch 104 
 and Tuesday Trigger: All Sweetness and Light for color inspiration

I love the three banners layered together.
 I used an embossing folder on the gray cardstock.

So sorry for the horrible photos and short post.
Teresa

Sunday, May 26, 2013

Beautiful Blooms Thank You

For today's card I used the wonderful sketch #212 from Unscripted Sketches.
What is so nice about this sketch is that you can leave it pretty simple and have a great little card or dress it up as much as you want.
 My inspiration to make this card all came from the pretty edged yellow ribbon that I bought yesterday at Jo-Ann's in the dollar section. I don't know about you but I always have to check out that section because I almost always find something I can't live without. Yesterday it was just the roll of yellow ribbon that came home with me. I matched the ribbon with the mat stack Cafe Mediterranean from DCWV.
I used the Papertrey stamp set "Beautiful Blooms II for the flowers and leaves. I used Broken China and Shabby Shutters distress inks to stamp the flowers. I kept adding things to the flowers after I had stamped them instead of just leaving them as they were, which is what I generally do. Instead I added the button and tied it with bakers twine and for the smaller flowers I added yellow pearls. The border strip is wrapped with twine and I roughed up the edges of the strip with my distress tool which I seem to be using on all my cards this week.
Here is a tip for your distress tool:
Mark the sections with #s so you know which ones have been used and are dull and which ones haven't been used and are still sharp. As you can see I haven't used mine all that much as I am still on the first section. But I know that is the section I have been using and will continue to use it until it no longer works before moving on to a different section and numbering it #2. Not a big tip but one that will help you to get a longer use out of your distress tool.
Here is a peek of the inside of the card.
 
 Once again I had a leftover strip of paper. It was a piece of the pretty floral pattern paper and I didn't want to throw it out or store it so I decided to use it on the inside of the card and stamped a flower and leaf to go with it.


Saturday, March 16, 2013

One More Thank You

Happy weekend!!
For my last thank you card I used this wonderful sketch from The Deconstructed Sketches. Go here
to the Deconstructed Sketch blog to see cards from the DT for more inspiration using this sketch. You might even want to play along.
Here is my card using The deconstructed sketch #93
 The paper is from DCWV and I think I was able to use just scraps to make this card which is always a plus in my book anyway :)
The striped banner was a leftover piece from another project so I decided it would work for this card and I added the red scalloped border because the card just looked too plain.
Now I just need to get my thank you cards ready to mail.

Enjoy your weekend.

Teresa


Wednesday, March 13, 2013

A Cheery Thanks So Much


Hello! I have a very bright and cheery card to share with you today.
In my last post I mentioned that I had another card I had wanted to make but had run out of time. Well today I got around to using this Mojo Monday Sketch #284

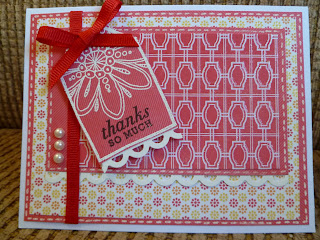
And here is the card I came up with:
 I changed it up a bit from the sketch but it still is very similar.
I used a stamped tag for the focal image instead of a circle. I did some white pen stitching along some of the edges and stamped the sentiment in black ink. I couldn't find a stamp to go inside the tag so I just picked an over sized flower and cut off the excess on the top and sides. I used Watermark ink and white embossing powder on the flower to match the graphic red and white raised pattern paper. I adhered the ribbon bow to the tag instead of at the top on the strip of ribbon and I used pop up dots to adhere the tag slightly askew.

Thank to all of those who have left such kind comments on my last post. They warm my heart.
Have a wonderful day!

Teresa