Tuesday, October 23, 2012

My Craft Space

Good morning! Today I thought I would share a little bit of my craft space with you all. If you are like me I like to see how other crafters have their space set up.
It's nothing fancy but I feel so lucky to have a room after for many years having to use the kitchen table and having my stuff stashed all over the house.
This is my desk that I had dreamed of having for years and now that I have it I looove it even after over a year of putting it to use.
 I bought this handy holder that spins from Micheal's and it holds lots of tools that I use almost every time I craft and more. I like that it holds my heat gun and I can have it plugged in and ready to go every time I need it. It also holds my bone folder, scissors, paint brushes, tweezers, watercolor pencils, craft mat and much more.
 This little three drawer container holds all kinds of markers, metallic pens, distress markers and glaze pens. It is really quite full now. I love how all my pens are front and center when I am creating.
 My Cuttlebug is to the left of my pens. I use the Cuttlebug for almost all of my cards or projects. Can't live without my Bug! To the left of my Cuttlebug is the three tiered cupcake holder. At first I wasn't happy with it because it was hard to get to things in the back especially on the bottom shelf. But I was able to solve the problem by putting it on a turntable. Now it works great for me. The top tier holds my spray mists, a few bottles of Smooches, glossy Accents and some other liquid glue, spray bottle of water and mini misters for perfect pearls. Second tier holds distress stains and a few jars of paper flowers, a big jar of UTEE and a couple of bottles of Glimmer Glam. The bottom tier has been changed a bit. It no longer holds the Tim Holtz inking tools. It now is home to several mini punches and two border punches that I use a lot along with the stamp that I use on the back of all of my handmade cards and three different corner punches.
 On the far left is my two  Cropper Hopper 12x 12 solid cardstock holders. I keep my 12" trimmer in front of the holders,  embossing folders and my favorite tag punch.
 My favorite part of the desk is the drawers. They come in three depths. The one inch drawers are perfect to store stamps in one layer.

 They also come with divided trays.This one holds all kinds of embellishments and keeps them nice and neat.
 The three inch drawers are great for holding punches and border punches. I didn't want to bore you so I didn't take pictures of all the drawers. There are ten 2" drawers on the left and on the right there are five 1" drawers and four 3" drawers. The third 3" drawer holds rolls of ribbon and one of the 2" drawers holds my  collection of Tim Holtz distress inks and inking tools and the other holds Stazon, ColorBox and VersaMark ink pads.
I was happy to get these two little white shelves up to hold punches that I use the most and the Creative Memories border punches.
This one holds decorative scissors, a few more punches and small rolls of ribbon.
 I hope you enjoyed the little tour of my craft space and if you have any questions just ask them in the comments.
Have a great day!
Teresa

Monday, October 15, 2012

A Sympathy Card

Hello blogland! I have been away for a while taking a break after helping to make over a hundred cards to send out for our service men and women for the upcoming holidays. I just think I needed a creative break. I'm jumping back in slowly.
 
I made a sympathy card for a friend whom I have known since grade school. Her mother passed away from  her battle with cancer. I should have made this card last week but I always find myself putting off making sympathy cards. I finally sat down last night and got it started then finished it up this morning.
Here is the card: 
 
My inspiration for this card came from a card from Karen Giron. I made a few adjustments besides using different papers and colors. I switched the bow and tag to the right side and placed the focal image more to the left and I left off the gemstones under the border on the right side.
I also left off the wonderful sewing that Karen does on everyone of her cards. My sewing machine is in the back of our hall closet so I rarely bring it out. I wish I had room for it to sit out in my craft room but I don't see that happening any time soon.
 The stamped image is from Inkadinkadoo and was stamped with Versamark watermark ink and embossed using white embossing powder. I then used a Spellbinders die and cut it out of the white cardstock. I then inked the circle with Broken China, Dried Marigold, and Peeled Paint distress inks. The edge is inked with Vintage Photo distress ink. I then adhered it to kraft cardstock that had been cut with another Spellbinders die.
I wrapped the border with twine and tied a bow. I added a paper flower to the middle of the bow and the sentiment on the vanilla tag was created on the computer and the border punch is from Fiskar.

Well I think we are back to our regular Pacific Northwest weather. It has been raining since yesterday and it's been a steady rain pretty much all afternoon. Looks like it's here to stay for a while.

Take care and come back for a visit soon.

Teresa

Saturday, October 6, 2012

Christmas & Birthday cards

Here are just a couple more cards that I made to send to the troops.
 
 Both these card designs were made from previous Freshly Made Sketches:
 FLT123
FLT116
My favorite sketch is FLT123 I made several different cards using that sketch. It was such a fun and easy sketch to use.


I love the ornaments on this card. I stamped them first on the white cardstock with black ink and embossed using black sparkle embossing powder then I stamped them again on white cardstock and colored the ornaments with distress markers then cut them out and glued them over the other embossed ornaments. I like how it gives more dimension to the ornaments and you can actually see the sparkle from the embossing powder in the photo. It is so hard sometimes to capture that in photos but I guess the lighting was just right at the time I took the photos.

Thanks for visiting my humble little blog and have a great weekend!

Teresa

Tuesday, October 2, 2012

Fall Cooking

During the fall months I get a hankering for certain foods and lately I have been longing for them a lot. I also like to hang out in my kitchen during the cooler months and try out new receipes.

The last few days I have been making homemade soup. Yesterday it was Potato soup and today I made Curried Lentil Soup. I will share these two recipes at a later date.

I have also been baking a bunch of Zucchini Bread with zucchini that came from our neighbors garden and this is the recipe that I am going to share with you since my husband thinks it's the best bread that I make.
The recipe I use comes from Better Homes and Gardens Old Fashioned Home Baking.
I have had this book forever and use it a lot especially when I want a good old fashion dessert. It has never failed me yet.
Here is the recipe:
 
11/2 cups all purpose flour
1 cup sugar
1 tsp ground cinnamon
1/2 tsp baking soda
1/4 tsp salt
1/4 tsp baking powder
1/4 tsp ground nutmeg
1 beaten egg
1 cup finely shredded, unpeeled zucchini
1/4 cup cooking oil
1/4 tsp finely shredded lemon peel (I didn't have any lemon peel so I omitted it and it still came out fine)
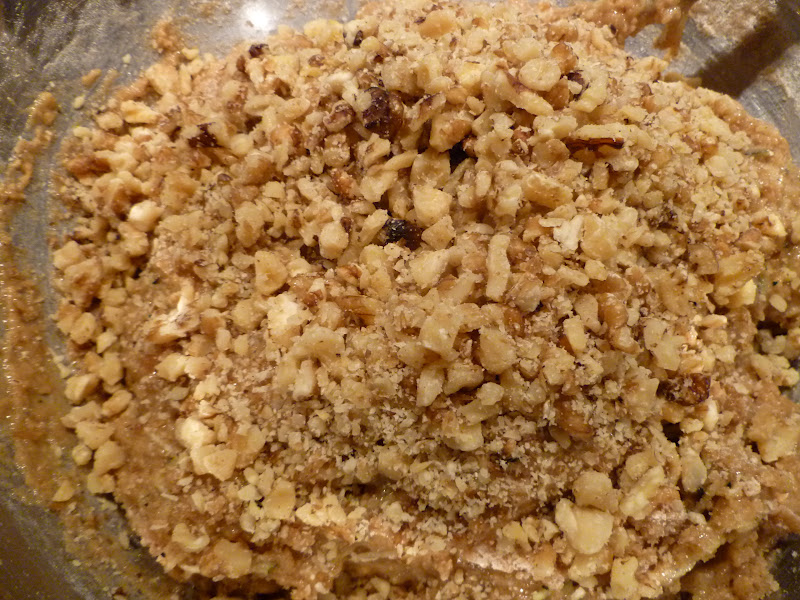
1/2 cup chopped walnuts
 
Grease an 8x4x2" loaf pan. Set aside. In a medium mixing bowl stir together flour, sugar, cinnamon, baking soda,salt, baking powder and nutmeg. Make a well in the center of the dry mixture so it looks like this:
In another medium bowl combine the egg, shredded zucchini, cooking oil and lemon peel if using.
I was making a double batch and I was using some fresh eggs from a friend that raises chickens that are just starting to lay so their eggs are still small. I used two of the smaller eggs to make one regular sized egg. You can see in the photo that the yolks from my friends eggs are darker than the store bought egg.
This is what the egg and zucchini mixture looks like:
Add zucchini mixture all at once to the dry mixture.
 Stir just till moistened (batter will be lumpy).
 Fold in chopped walnuts.
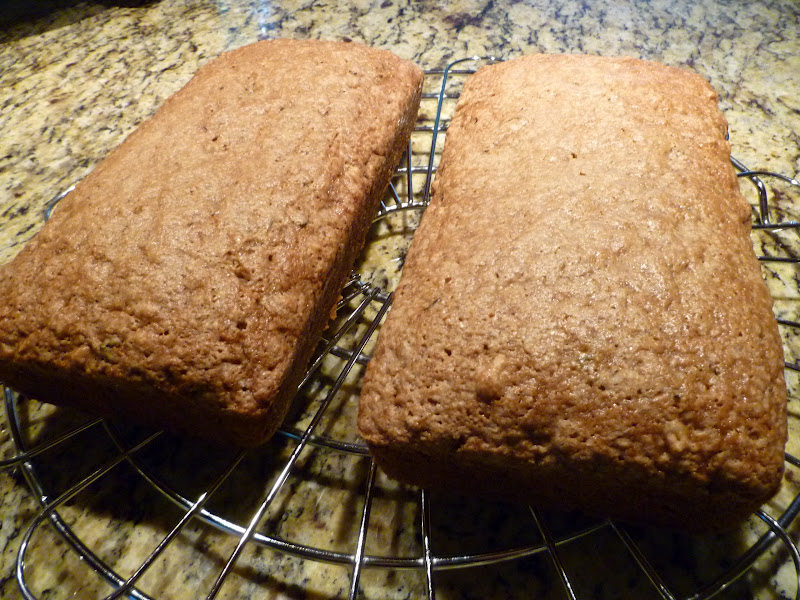
Pour batter into the prepared pan (remember I am making a double batch so I have two pans).
 Bake in a 350 degree oven for 55-60 minutes or till done. Mine were done in 40-45 minutes because I have a convection oven. Cool the bread in the pan on a wire rack for 10 minutes. Then remove bread from pan and completely cool on the wire rack.
The bread comes out with a slightly crisp top and the inside is so moist and yummy. A slice of zucchini bread goes good with a cold glass of milk or a cup of hot tea.
I gave the other loaf to the neighbors who gave us the zucchini to thank them for thinking of us. And I think I will make another batch tomorrow as my husband has a meeting to go to tomorrow night and wants to bring a loaf to share.
 
So I was wondering what are your favorite fall foods?
 
Teresa


Monday, October 1, 2012

A Merry Monday

As I was looking at some of my favorite blogs I came across this sketch challenge on Lisa's blog, Snowy Moose Creations:
Even though I was too late to enter the Merry Monday Challenge I thought it was a great sketch to make a Christmas card for the troops.
Here is the fun card I came up with using this sketch:

I used a  snowflake Cuttlebug embossing folder on the card base and Spellbinders Nestabilities to cut out the pattern paper and white cardstock.
The ribbon is from Papertrey Ink and the snowman image and snowflakes are from Stephanie Barnards Stamps of Life. The senitment is also from Papertrey Ink. On the snowman I used VersaMark watermark ink and used sparkel black embossing powder. The snowflakes were stamped with Tumbled Glass Distress ink and the sentiment was stamped using Memento Tuxedo black ink.
I used kraft colored cardstock to help tie in with the pattern paper and inked the edges with Fired Brick distress ink.
 
Now I am off to make some more zucchini bread. Our neighbor was so kind to give us a couple of big zucchinis so I thought I would make them a loaf to thank them.  
Teresa