Sunday, August 25, 2013

Wishing You

So how was your weekend? Ours was very nice. Had a cook out on Saturday for some friends and had a nice visit with them.
Today after doing a bit of cleaning up from last night I was able to get in some crafty time so I have a card  to share with you tonight.
 Viva La Verve Sketch Challenge AUG Week 4 was used for the design
 I decided to flip the sketch on it's side just because. ;)
The colors of the card came from the fabulous inspiration photo at Moxie Fab World's Tuesday Trigger:
Isn't that cup and saucer delightful! I was so hoping that I would have time to play along this week because I just love all those beautiful colors of the flowers and saucer.
I wanted to capture the translucent color of the saucer.The only way I could think of getting that look was by  using vellum. I inked a piece of vellum with Tumbled Glass distress inks and inking tool and adhered it to white cardstock before running  both through the Cuttlebug with an embossing folder. It is really hard to capture the color of the vellum with the camera. It is so very pale.
 It took me a while to figure out what colors to use for what elements. I had so many options but I eventually worked it out. The papers are from DCWV Matstack Citrus. I love how subtle some of the pattern paper is from that stack.
 
The flower stamp is from an Heidi Grace set called Paradise. I stamped it with StazOn, Blazing Red ink and cut it out adhering it with a pop up dot. The sentiment is from the Verve stamp set "Wishing You". I backed all the elements with red pattern paper to help each one stand out a bit more.
And since I used vellum I thought I might as well enter this card in A Blog Named Hero's #30 Victorious Vellum Challenge:

All you need to do is use vellum on your project. Stop by their blog and check out the amazing  projects of their Design Team. You will be wowed!

Thanks for dropping by.

Teresa


Friday, August 23, 2013

I Love You

Oops where did the sun go? It has been hiding behind some clouds this morning but is now trying to make an appearance.
I have a card today that I used three different challenges for it's inspiration.
First off here is the card:

This card makes me happy for so many reasons:
1) It's so not my style and I was flying by the seat of my pants and really had no plan for it other than the sketch and colors but I am very pleased with the outcome.
2) I finally was able to use bubble wrap! I love the look of bubble wrap but never had the right project to use it on. So I can write that off my creative bucket list. (does anyone else out there have a Creative Bucket List?)
3) It has lots of texture. I love texture and using my embossing folders. I even used a couple that had never been used which is something that always makes me happy, happy, happy!
4) And lastly I finally used  a stamp from the Inkadinkadoo set "An Affair From The Heart". I really don't know what possessed me to purchase it in the first place so many years ago 'cause it really isn't my style of stamps although they are pretty cool. Maybe for teens but not for me.
Here is sketch #307 from Mojo Monday that I used:
They always have such neat sketches and I love using them.
This is my first time playing over at A Mixed Media Color Challenge! They are new and this is only their 6th challenge. The DT has some really beautiful and inspiring work. So please drop by and give it a whirl! You'll be glad you did.
The colors for this challenge are light and bright pink and gray as your main colors. "Also this is a MIXED MEDIA color challenge therefore we would like for you to COMBINE at least TWO types of MEDIUMS (ie: paints, markers, pastes, mists, inks, etc...), in addition to the "traditional" stamped / colored image to create your project." I used distress inks and gelatos and maybe the bubble wrap counts too. :)
And for my third challenge I'm entering this in the Lawnscaping Challenge #64
For this challenge all you have to do is use any distress product or technique of your choice. Which I used distress inks which are my favorite type of inks to use.
Now a little more about the card:
 
 This is the image I used from the "An Affair From the Heart" stamp set. It's stamped on white CS with Dove Gray Memento Ink. A Spellbinder's die was used to die cut it and emboss. Finally the edges are inked in Pumice Stone distress ink.
Actually the first thing I did was to stamp the white card base with the bubble wrap. I don't know how others do it but I just swiped the Picked Raspberry distress ink pad directly on the bubble wrap then turned it over and layed it on the CS and gently pressed on it. Love, love the look!
Next I made the two triangles for the corners with light gray CS and layered the gray with light pink CS and ran layered triangles through the Cuttlebug with an embossing folder. Next I used the inking tool and Picked Raspberry DI to highlight the raised parts of the embossing and adhered the finished triangles to the card base. The banners were made from white CS and ran through the Cuttlebug in three different embossing folders. Then I used a gray and pink gelatos to add color to the banners and a bit of water . I find that if you are using regular CS instead of watercolor paper it is best just to spray some water on your mat and dip your finger in the droplets and blend the gelatos instead of directly spaying your CS with water. The CS tends to get too wet that way.

 The sentiment is from The Stamps of Life, Banners 4 All stamp set. I had wiped some of the gray Gelato on a scrap piece white CS to test it so I just used to stamp the sentiment on and punched it out with a CM circle punch, layered it on a light pink piece of CS that had been stamped with the Envelope HA stamp in Picked Raspberry and ran through the Cuttlebug with a Spellbinder's die. The edges are also inked with the Pumice Stone. I added a dark pink gem to the o in the word You.
And lastly I thought the top right corner of the focal image needed something so I got out my Tim Holtz Idea-ology  Gears and instead of using a brad in the center I used dark pink gems to match the one I used in the sentiment. I then inked the edges of the card to frame it and pull it altogether.

I think I will be sending this card to my daughter. This summer she had two summer classes and was working two jobs and moved right before finals so she was pretty stressed out. Thought it would be nice to let her know we love her and our proud of her.

Sorry this post turned out to be so long. Thanks for sticking with me to the end. :)

Have a great weekend!

Teresa


Thursday, August 22, 2013

Lawnscaping Challenge#64(2) and Viva La Verve Sketch Challenge Week 3

Good afternoon to you all on this sunny Thursday! The sun is out but I think the air has a hint of fall to it. The sun doesn't feel as intense as it has earlier this summer.
I just finished a card so I thought I would pop by and share it now:
For the design I used Week 3 of Aug. Viva La Verve Sketch Challenge:
I'm not sure I did the sketch justice as I am not as pleased with the outcome as I usually am. Maybe this is one of those cards that will grow on me.
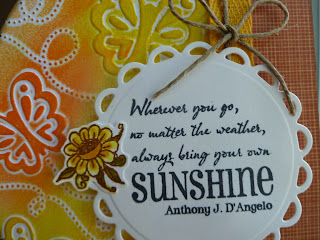
Any way for the oval element I cut it out of white cardstock using CM Custom Cutting System then embossed it with a Cuttlebug butterfly embossing folder. I was determined to use my Gelato's for the very first time. My first attempt was horrid so I turned it over and tried again. The results were better and I even thought about going ahead and using it because I hate to throw anything away. But in the end I decided it had to go in the trash bucket and I started all over. This time I was much happier and thought it was card worthy. I also inked the edges of the oval with Walnut Stain distress ink to define the edges and give it a more finished look.
My sentiment is from Verve's "Feel The Sun" set and so is the little flower. Both are stamped on white cardstock and I colored the flower with distress markers. It is also my first time using the markers and I find that they are really intense color. It worked better when I spritzed the flower with water as it lightened the color a bit. The strip of pattern paper is from CM and I added some twill ribbon along side of it. I decided I needed to add some twine down the center of the twill ribbon and added a bow so it peeked out above the sentiment. I also rounded two of the corners of the card...something I haven't done in a long time.
I thought the card needed to a small bit of something at the top left corner and decided to add the lace banner and the row of pearls down the center. I think the lace and pearls make the card a little more feminine. What do you think?

I am also going to enter this card in the Lawnscaping Challenge #64.
You can see my first card I entered for this challenge here.
All you have to do is make a project with distress products or a technique of your choice. I probably use distress ink on almost every card I make. I love distress inks because they are so fun and easy to use!

Have a great day and I'll be back soon!

Teresa


Wednesday, August 21, 2013

Annual Summer Camping Trip

Hello to all on this wonderful Wednesday morning! I am finally getting around to posting our camping adventure from a week and a half ago.
 We were at Lincoln State Park in Eastern WA. This was our third year of going there with a group of friends. We are all about the same age and so are the kids. View from the door of our trailer.
 I love the brown rolling hills that surround us.
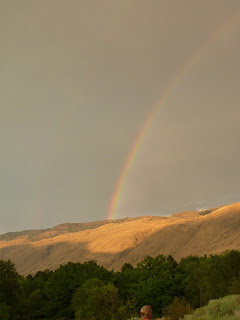
 It sprinkled a bit the day we got there and it produced a rainbow.
 I couldn't quite get both ends of the rainbow in the picture.
 So here is the other end.
 I can't believe I didn't get a picture of our new truck we bought just a little over a week before we left for our trip. Will have to fix that on our next trip. Loved having that big evergreen tree there to block the wind. It can get very windy especially in the evenings and it did blow one night and even the big tree couldn't block it all.
 Actually it was double rainbow but it was so faint I don't think you can see it in either of these two photos.
 The second rainbow would be to the left of the one you can see.

 This was just some grass that I thought was cool looking and I meant to get some better photos of but never did. Too busy relaxing and having fun.
 This is one of the docks and boats our group had and the sky was so much prettier in real life.
 The clouds were very pretty colors that first evening.
 We spent most nights star gazing either out in the boat or in the campsite watching for falling stars. We didn't see as many as we usually do and we missed a couple of nights because it was too cloudy. But we did have a great light show with the heat lightning and lots of thunder to go with it.
We enjoyed the many fruit stands that were just down the road from the State Park. The sweet corn was the best I have tasted in a long time. I think we must have had sweet corn for dinner at least three times that week. Just couldn't get enough of it. We always grab a box of fresh peaches to bring home with us so I can make fresh peach pie and this year we grabbed some of that yummy corn.
We've already eaten the two pies I've made and I made a couple of pie fillings to put them in the freezer so I can make fresh peach pies this winter. I am also just freezing several sliced peaches to use in smoothies. My favorite smoothie is a peach, banana and frozen mango with yogurt and a touch of honey. It is sooo delicious.

That is it for now. Enjoy your day!

Teresa

Tuesday, August 20, 2013

The Shabby Tea Room, Cardabilities and Lawnscaping Challenges

Happy Tuesday! It's a great day here in the Pacific Northwest and I hope it is a beautiful day wherever you all are.

After I am done with this post I am headed outside to catch up with the yard work and enjoy the sun. It has been such a glorious summer here so I want to take advantage of it whenever I can and I know winter will be here before we know it. The days are already noticeably shorter and the fireweed is almost done blooming which is a sign that summer is almost over and winter is fast approaching.

 Any way back to the reason of this post which is I have a card to share:
 
I used the inspiration from The Shabby Tea Room , Material Girl for the colors (green and blue) and then they wanted us to use material ( I used canvas for the material) and flowers (flowers are in the pattern paper and I also used teeny green paper flowers)
i
Isn't this a gorgeous photo! As I said before I used the colors green and blue and I also used the dress form as my focal image.
For  my cards design I used the sketch from Cardabilities:
You really need to stop by their blog and see all the pretty inspiration from their DT. 
I stayed pretty true to the sketch on this one.
After die cutting the dress form out of sticky back canvas I embossed it with a Tim Holtz folder (the die was also a Tim Holtz die). Next I inked the top part with Tumbled Glass distress ink and the bottom portion with Shabby Shutters distress ink.The edges were then inked with Walnut Stain distress ink. To dress the form up a bit more I made a pearl necklace and around the waist I added belt of tiny green paper flowers. To the flower centers I added two green sparkle gemstones and the middle one is blue.
Next I die cut the stand out of pattern paper, inked the edges with distress ink and pieced it together with the dress form and added it to the light green pattern paper with the stitched floral pattern which I thought fit the theme of my card very well. I distressed all the edges of my layers with my distress tool and inked the edges with Walnut Stain distress ink.
On the middle layer I added pen stitching with a black pen. I stamped the round spool top image with a Tim Holtz stamp with black ink on a scrap of white paper that I had swiped with paint and cut it out. The edges were then distressed and inked. I made a lace banner and the other banner is out of white cardstock and edges inked with distress ink. I stamped the Technique Tuesday "Happy Birthday" in black ink.
I love the fact that this card is flat even though it has lots of layers making it so much easier to mail.
And since this card has lots of distress going on I thought I would also play over at Lawnscaping.
 
They have a Distress Maniacs Challenge going on and this card fits the challenge very well don't you think? I used distress ink and paint and distressed the edges of my papers. This is my first time playing over there. You should drop by and take a peek at the inspiring projects of their DT. I'm sure they would love for you to play along too!

Thanks so much for dropping by and have a great day everyone!

Teresa


Saturday, August 17, 2013

Nautical Tuesday Trigger and Viva La Verve Sketch Combo

Happy weekend to you all! It has been a busy but fun weekend with friends. It started Friday when we invited a couple over for dinner and I made a fresh peach pie for dessert. It was a big hit. After a long dinner (long because we were having a great conversation) outside on the patio we came inside and played our favorite board game, Sequence. Guys against the gals. Sorry gals the guys eventually ended up with more wins. Now today our friend from Arizona is going to be with us tonight for dinner and stay overnight. It's always great to visit with old friends.
Anyway onto the reason for this post.
Here is my rustic card for today:
 
It really makes me happy not because it is the best card I've ever made. That it is surely not, but I was able to use lots of different stamp sets together and some were really old and some were my most recent stamp 
 purchases and recycled packaging all in one card.
To help jump start this card I used the Viva La Verve Sketch AUG week 1: 
...and I combined the sketch with this weeks Tuesday Trigger, Craving Navy over at the Moxie Fab World.
Now I don't know about you but when I saw the colors and the stripes I immediately thought nautical. So I reached for my new Verve "Strong Anchor" stamp set and die then paired it with a sailboat from a Hero Arts stamp set and an old double rope frame stamp from Posh Impressions (the date on the stamp says 1997) and the sentiment is from another HA set.
I knew I wanted to incorporate the blue and white stripes but didn't have any stripped pattern paper so I used blue cardstock and an old Close to My Hearts Stripe Stencil which was still in it's original packaging unused. Next I got out my molding paste from Golden to use with the stencil to make white stripes on the blue cardstock. I wanted it to be round to add some texture so I used a foam brush to apply the molding paste instead of a credit card.
I love how fast the molding paste dries because I don't have a lot of patience for drying times when I am in a creative mood. I have to admit though once I had the stripes done I was at a loss at what to do next with the two diagonal pieces. It was late so I decided to go to bed and maybe something would come to me. Sure enough before I fell asleep I thought of using twine. First thing in the morning I grabbed my twine but it was too thin and was really lost on the card. Not daunted I remembered my ball of jute that is much thicker. It worked perfectly. I think the jute makes it look a bit rustic don't you think?
Next I worked on the focal image. I have to tell you how about the background. It is from a tea box I had emptied and was breaking down to put in the recycle bin when I noticed how pretty the inside was. I thought it looked similar to the rug in the Tuesday Trigger so I used it to stamp my images on. Thanks Tazo for making such a pretty design on the inside of your boxes of tea!
The rope circle frame is from Verve and sailboat from HA and both are stamped in Faded Jeans distress ink.
I stamped the sentiment on a blue fishtail banner with VersaMark WaterMark ink and embossed with white embossing powder. The anchor die is also from Verve and I wrapped some twine from The Twinery.
I needed to add something on the right side of the sentiment to balance out the anchor and thought gold gemstones would work with the nautical theme. The outside rope frame is stamped on white cardstock with Faded Jeans and cut it out with a craft knife.

So that is the story behind the card. It's great to have a masculine card on hand. I am always short on those.

Thanks so much for visiting and leaving a comment or two!

Teresa


Friday, August 16, 2013

Celebrate-Viva La Verve Sketch Challenge

Good morning my friends! Hope you day is off to a great start.
Today I am sharing my card that I made using  Viva La Verve Sketch Challenge (Aug Week 2).
It turned out just a teeny bit different than the sketch.
As you can see from the sketch I was suppose to have had a heart that is sandwiched in between the two ovals. It just wouldn't work out no matter what size or shape of heart I tried
I  was able to pull out my Marvy punches that haven't been shown any love for quite a long time. I used the oval scalloped shapes in two different sizes. On the outer oval I paper pierced each scallop and inked the edges of both ovals and the outer edges of the card base with Frayed Burlap distress ink. Now if you know me you know I usually use Walnut Stain or Vintage photo to ink my edges but today I used Frayed Burlap as I wanted a softer look The sentiment is stamped in Tuxedo Black ink and is from Inkadinkado.
I added two lines of pearls along each side of the middle strip. I felt like there was too much space underneath  the layered ovals so I added lace ribbon tails to fill the void.
Like I mentioned before I couldn't find a way to add the heart as in the sketch so I punched a heart with a small scalloped heart punch from Creative Memories from white glitter paper and inked the edges with the Frayed Burlap distress ink before adding it to the bottom of the scallops.
Thanks so much for dropping by my sweet friends! Enjoy your day.
Teresa


kld;