
(Click on the photos and you will be able to see it larger)
Wish I could get a better picture of it. Here is the story on how it all came to being.
For weeks I kept seeing this pretty piece of 12x12 paper that only had a piece of the bottom right corner torn off that had been used for a small project about two years ago. It kept playing in my head that I could do something really cool with it but just put that thought on the back burner. Then I came across a 12x12 canvas in my stash and thought I could use the canvas with the paper and come up with something kinda cool. But I was too scared to start as I had no idea what I was going to do. So a few nights ago I got brave and just jumped right in with really no plans except the paper and canvas
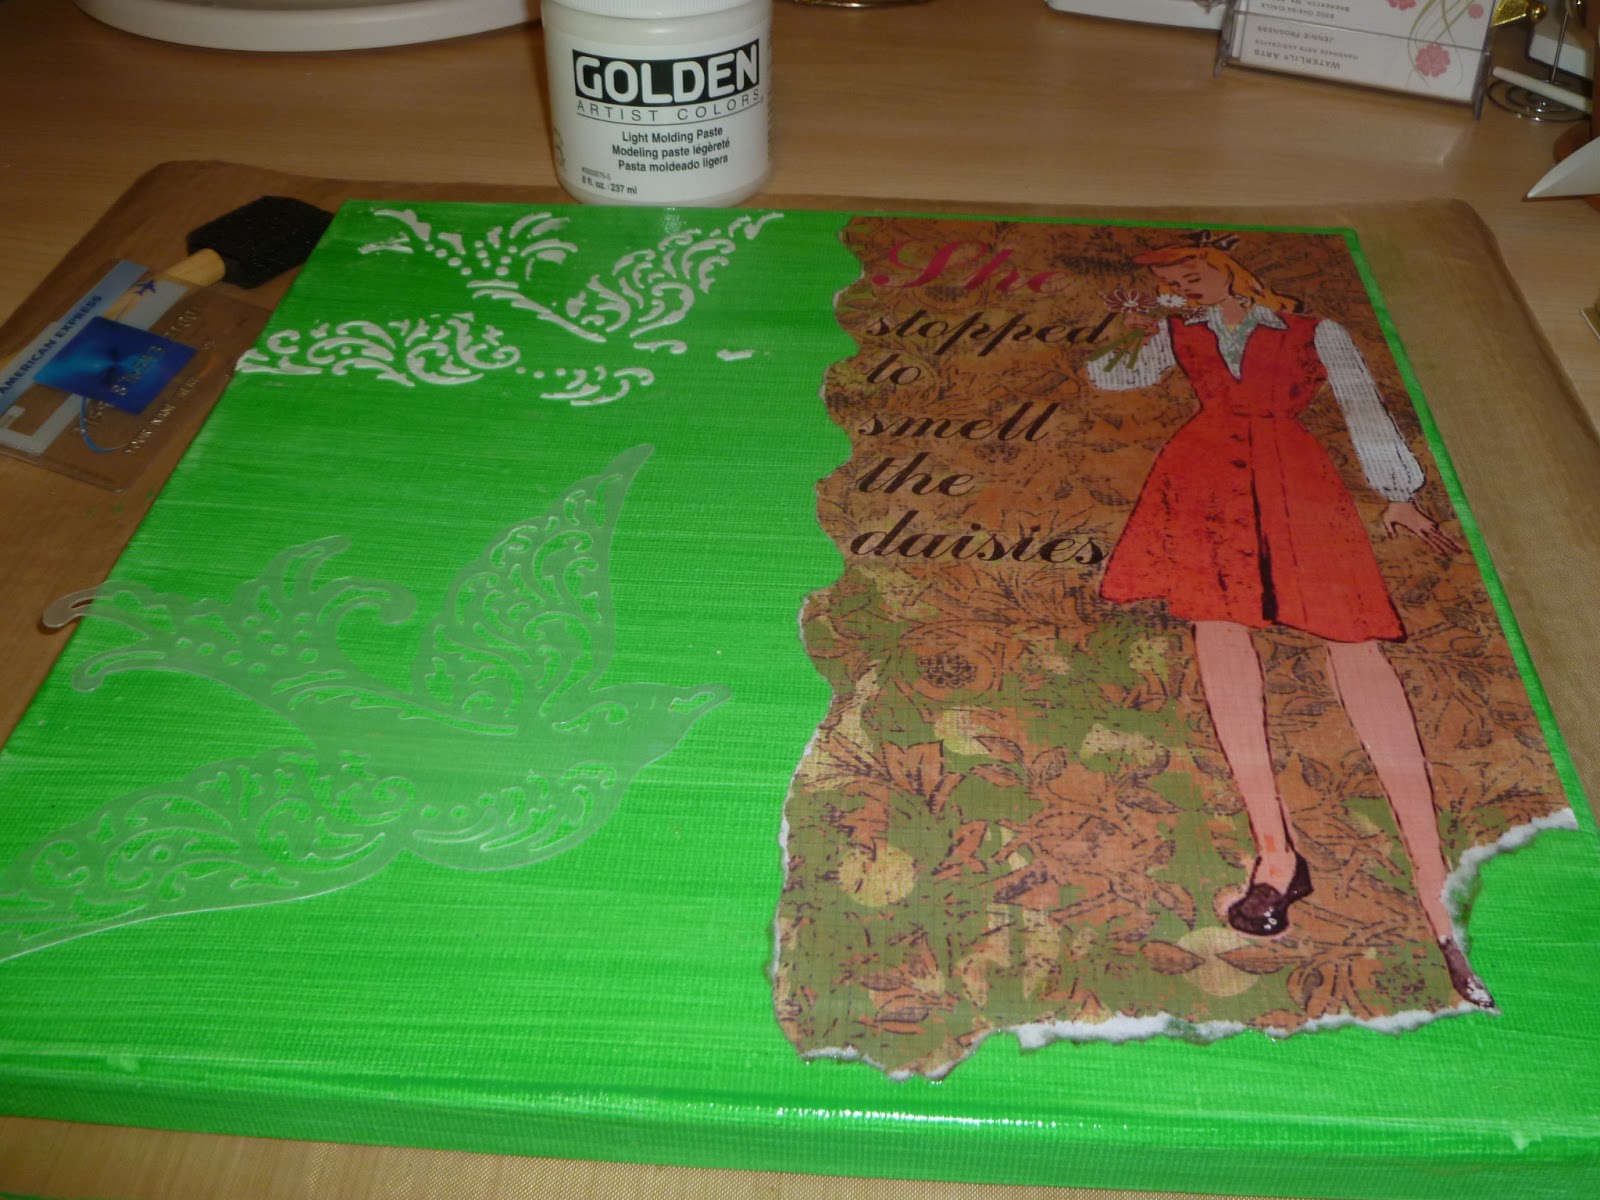
First step was to paint the canvas green. I really didn't want this bright of green but it was all I had so I went with it.

After the canvas was painted and dried with a heat gun I then tore the paper in half and used Mod Podge to adhere it to the canvas and then covered the whole canvas and top of the paper with Mod Podge. This I let sit overnight.

Next I thought I would try out stencils and Molding Paste. I laid the stencil where I wanted it then took one of those fake plastic credit cards (that come in the mail every other day) and put a teaspoon or more on the credit card and ran it over the stencil. I used Golden Artist Color Light Molding Paste in case your wondering. Then I let that dry for most of the day which gave me time to think about what I wanted to do next.

I decided to add color to the Molding Paste and used Mustard Seed distress ink applied with the inking tool.

Here is a close up so you can see how thick the molding paste is. It's not too thick but yet it gives great dimension.
I used Scarlet Tattered Angels Glimmer Mist after I laid the bird stencil back down over the dried molding paste and spritzed a few times. The glimmer mist turned the yellow distress ink orange which was fine with me.I think the red would have been too dark. Next time I will try coloring the Molding Paste before applying it.
I used Scarlet Tattered Angels Glimmer Mist after I laid the bird stencil back down over the dried molding paste and spritzed a few times. The glimmer mist turned the yellow distress ink orange which was fine with me.I think the red would have been too dark. Next time I will try coloring the Molding Paste before applying it.

Here is a close up of the bird after it was misted.

I decided to use stamps next so I gathered a bunch of different stamps and started stamping with Memento Tuxedo Black and Red

I just kept stamping until I felt like it was balanced and done. I really had fun with this part. It really doesn't matter if the stamping isn't perfect so there is no pressure there. Although I did put a small pack of cardstock under the canvas where I was stamping to give me a better surface to stamp on. This is what it looked like when I was done.

I continued stamping a few words under the bird in Tuxedo Black. At this point I am almost done. All I have left is to make some daisies.

I used a punch to punch the six white daisies. I wanted them to be red and white so I stamped Fired Brick distress ink right onto my craft sheet and spritzed with a bit of water before dragging each flower through the ink. I tried using Picket Fence Distress Stain by putting it directly on my craft mat just like the distress ink then drug the red inked flowers through the Picket Fence stain. I didn't really like the look so I only did a few that way. It took away the vibrant red and made the flowers to light. I also took a dry embossing tool and rolled it around the middle of each flower while on a soft mouse pad to curl up the petals. Next I used three shades of brown cardstock ran it through the cuttelbug with the Swiss Dot embossing folders then punched out circles to use as the middle of the daisies.

I spritzed the finished flowers with Gold Perfect Pearls for a little glimmer. Here you can see a bit of the glimmer from the Perfect Pearls.

I used a Fiskar border punch and green pattern paper to make a grass border under the paper. I inked the grass border with Walnut Stain Distress ink before adhering the grass with Mod Podge. I then applied Mod Podge over the top of the grass border and let it dry.

Last but not least I adhered the flowers randomly to the canvas around the lady and along the grass. By the way the grass border and the flowers pretty much cover up the missing torn paper.

If you are still with me through all that :) thanks for staying to the end for I know it was a long post.
If you have done a mixed media project leave me a link to it as I would love to see it.
Thanks for your visit!
Teresa
If you have done a mixed media project leave me a link to it as I would love to see it.
Thanks for your visit!
Teresa


WOW!!! That is really stunning! I could never sit down and come up with anything like that. Truly gorgeous and creative work Teresa!
ReplyDeleteI left a comment but I don't think it saved. This is so fun and creative! Fun to incorporate other elements into papercrafting.
ReplyDelete