Saturday, July 9, 2011

Cheery Birthday cards

Earlier this summer I was browsing through the $1.00 section in Micheal's and ran across packages of some cupcake dimensional die cut stickers. There were four to a pack and  they were covered in glitter. I grabbed one pack. Now I wished I had picked up more. I just made four cards with them and they turned out so cute.

 This card was the third one I made and used just scraps of paper left over from the first two cards.  I embossed the pink cardstock with cupcakes then just arranged the rest of the paper shapes to where I liked adhered it all down and stamped the sentiment, "a day to celebrate".

Here is a close up of the sticker. Lovin' the luscious strawberry on top.

Here is the first card I made with one of the stickers. With the sentiment "your so sweet" it could also be a thank you card. I made the borders with a Martha Stewart scalloped border punch with a small heart in each scallop.

I wrapped a white grosgrain ribbon along the top of the scalloped borders and ran the dark pink cardstock through an embossing folder. To add a little more bling I added dark pink rhinestones to the sentiment.

This was probably the quickest one I made. I backed the sticker a little differently by using different colored cardstock. Instead of white and dark pink I used light pink then red cardstock. I just adhered the background pattern paper and wrapped light pink rick rack around that, added the backed sticker and stamped the sentiment "celebrate" and it was done.


Here is a close up. Aren't these just the most darling stickers?


And here is the last cupcake with a cherry on top! Oops I cut off the sentiment. It says "wishing you the best day ever!". I finished this card off with a piece of dark pink embossed cardstock and light pink rickrack.


Here is a close up. Maybe if you click on the pictures you will be able to see the glitter. These cards were so fun and fast to make. Pink and green is one of my favorite color combos especially for fun birthday cards.

What are some of your favorite color combinations you like to use for birthday cards?

Retro Cupcakes


For the last 3 weeks or so I haven't been able to play along in the Tuesday Trigger Challenge or any other challenges till now. I love the little bit of doily used as a table cloth in the card that is the inspiration for this weeks Tuesday Trigger which you can find here http://www.moxiefabworld.com/2011/06/tuesday-trigger.html
This cute card can by found on page 134 in the Stamp It! Cards and was created by Tina Fussel. Besides the doily I also really liked the pastel colors.


Later I ran across this card sketch on Jen Tapler's blog. The sketch is from Verve Stamps. As soon as I saw this sketch cupcakes came to mind. 


I wanted the card to feel like the cupcakes were sitting in a bakery shop. I went with the pastel colors of the TT card but just a shade or two darker. I gathered up my Martha Stewart cupcake punch, all the doilies I had and ended up using a square card for the base of my card. The pattern paper is an old old paper pack from Creative Memories called Cabana. It is very retro and not really my style but you know what I ended up liking it alot after all. I made some scrapbook pages for my daughter's Freshman Dance as the blues and tan matched her dress. Now I am making a card with it.


I had intended using the blue and yellow pattern paper as the background but I cut it too small and I didn't have another piece large enough. I was determined to make it work so I made a mat out of kraft cardstock to go under it .


 I chose to cover the center of the doily with a yellow paper circle to make the four kraft squares stand out more. I originally had just the doily squares but there was still too much white and they ended up getting lost. So I just backed them with a larger square of kraft cardstock.

 Each of the cupcake liners are of a different color and for the icing I used dark brown cardstock. A pop up dot was used to give a little dimension to the frosting while the liners are adhered right to the doily square. I also filled in the brown cardstock icing with Glossy Accents. I love how it made the frosting shiny and gives even more dimension making it look like real chocolate icing. I wanted to add some seed beads for sprinkles but was afraid it might ruin it so I left well enough alone. Maybe next time.


For the last square I was going to stamp the sentiment "it's your birthday" directly on the square but I first stamped it on a scrap square and layed it on top to see if it balanced out the card. I decided I liked the layered look of the two kraft squares and used pop dots to adhere the smaller square. I then stamped "eat cake" in brown ink on a white banner and trimmed it down to fit and was done. 

I am really pleased with how the card turned out. Now for some reason I'm hungry for a cupcake!


Wednesday, July 6, 2011

Blue Ribbon Anniversary Card

A good friend of mine is celebrating their 21st wedding anniversary this week and I thought it would be fun to make them a card to help celebrate the occasion. I can count on one hand how many anniversary cards I have made so I don't have much experience in this area of card making. So I grabbed a couple of Paper Crafts magazines to thumb through for some quick inspiration. I didn't have to look far. The first magazine I picked up was a recent publication, 350 Cards & Gifts. When I came to page 35 I fell in love with the Lovely Note Card Set by Lucy Abrams. I thought it would make a perfect anniversary card. 

I stuck pretty close to how she made hers with just a few minor changes. She made a set of four 41/4" x 51/2" note cards in pastel colors. Since I only needed one card I chose to do my card in blue and I changed the card size to 5" x 61/2"
I started with a blue cardstock base the size of the card. I chose a Hero Art stamp, Flourish which I inked up with Versa Mark ink and stamped on kraft cardstock and embossed with white embossing powder.On her note cards Lucy stamped on the kraft paper using white ink and no embossing.
I cut the stamped kraft cardstock to the size I needed.

 I then chose a scalloped border bunch with a heart in each scallop which I thought fitting for an anniversary card.

  I then tied a blue satin ribbon onto the embossed kraft cardstock towards the top and then adhered it to the white scalloped edged paper and adhered that on top of the blue cardstock. I adhered that to the card base. I decided to add a stick pin I had decorated with gold tulle and a clear bead and stuck it through the bow.


Lastly I stamped the sentiment Happy Anniversary in black Staz On ink on a white banner and inked the edges of the banner with Broken China Distress Ink and attached the banner with pop dots to the bottom of the card.

I love Lucy's note card set and love the white ink on kraft paper and have many ideas to make more of this lovely set. So don't be surprised to see more of these.

PS Sorry for the straight out of the camera photos. I am not using my computer so I didn't have any photo editing software to do any editing. I couldn't even crop them.

Thursday, June 9, 2011

Lighthouse and Tree

Just finished my Father's Day cards. Whew! I don't know why but I always find it so hard to make cards for guys.
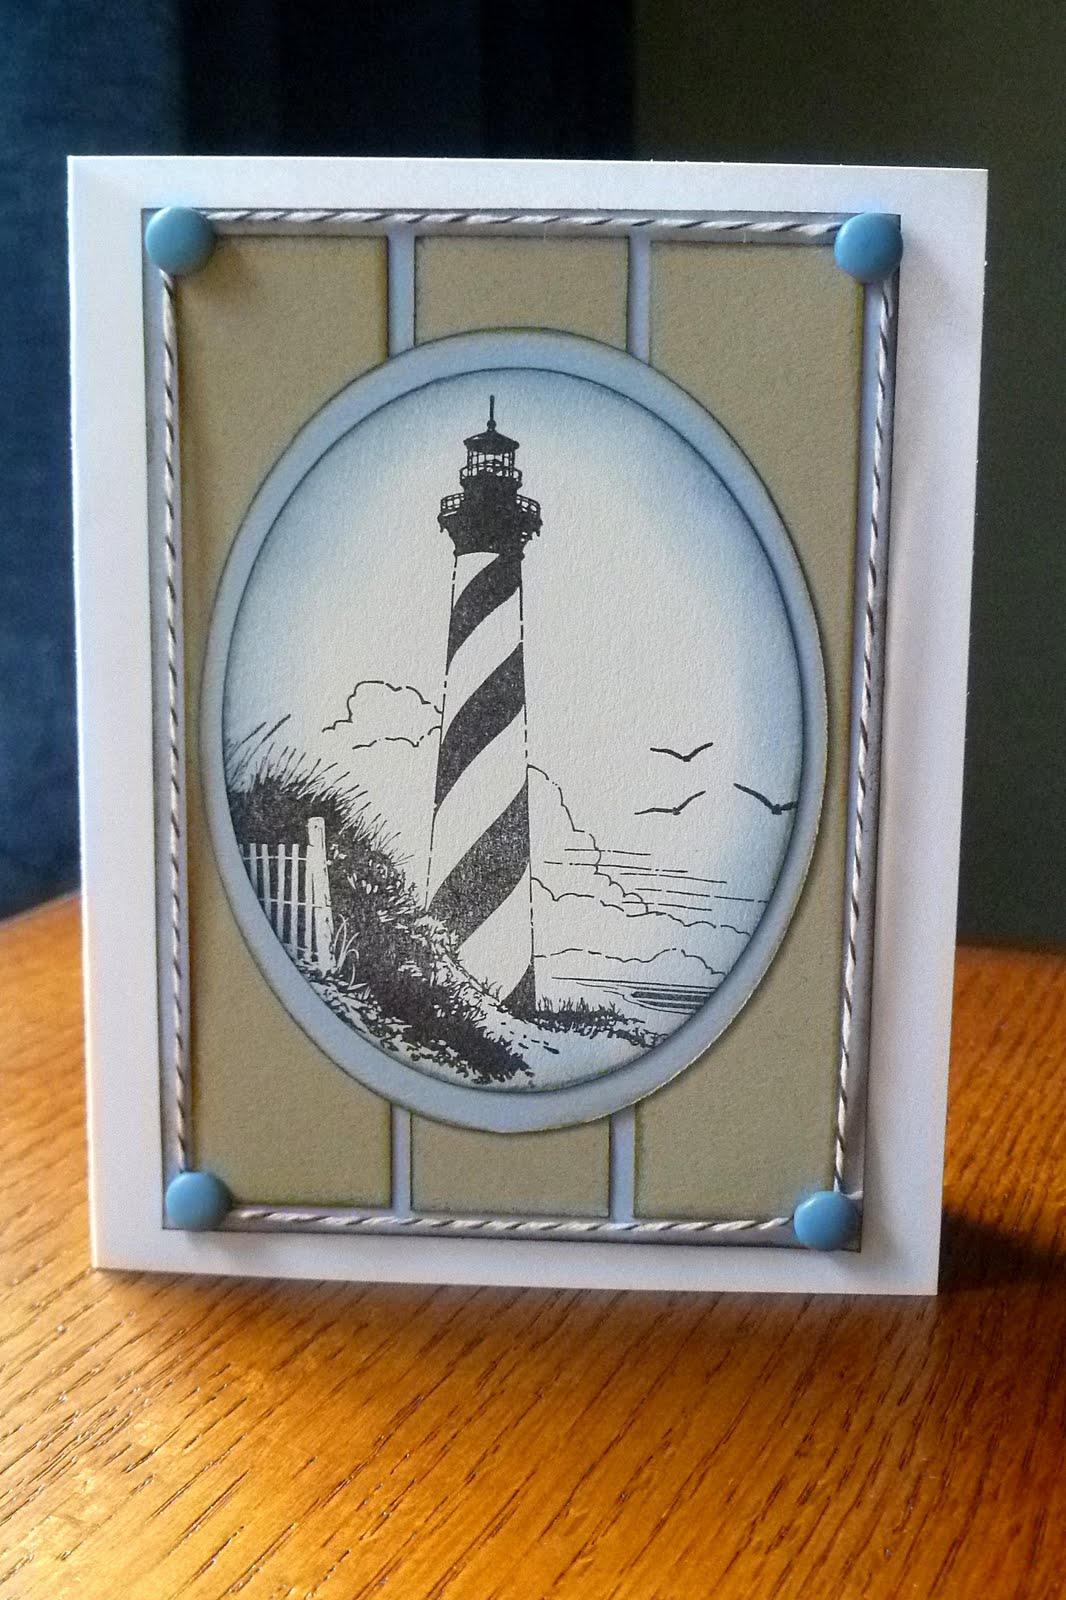
The first one up is the one I did for my husband:
I really liked how this card turned out. I used white cardstock to and jet black Staz On ink to stamp the image. Then I used Faded Jeans Distress ink on the edge followed with Vintage Photo Distress Ink. I used light blue cardstock to mat the stamped image and inked the edge with Vintage Photo along with all of the other pieces. I adhered the kraft strips of cardstock to a light blue piece of cardstock.
 I punched holes in the corners of the light blue mat and used brown and white Baker's Twine wrapped around the blue brads in each of the four corners so the Baker's Twine framed the mat.
Before I adhered the large blue mat I had to cut part of one prong off of  each brad since it was going to show.
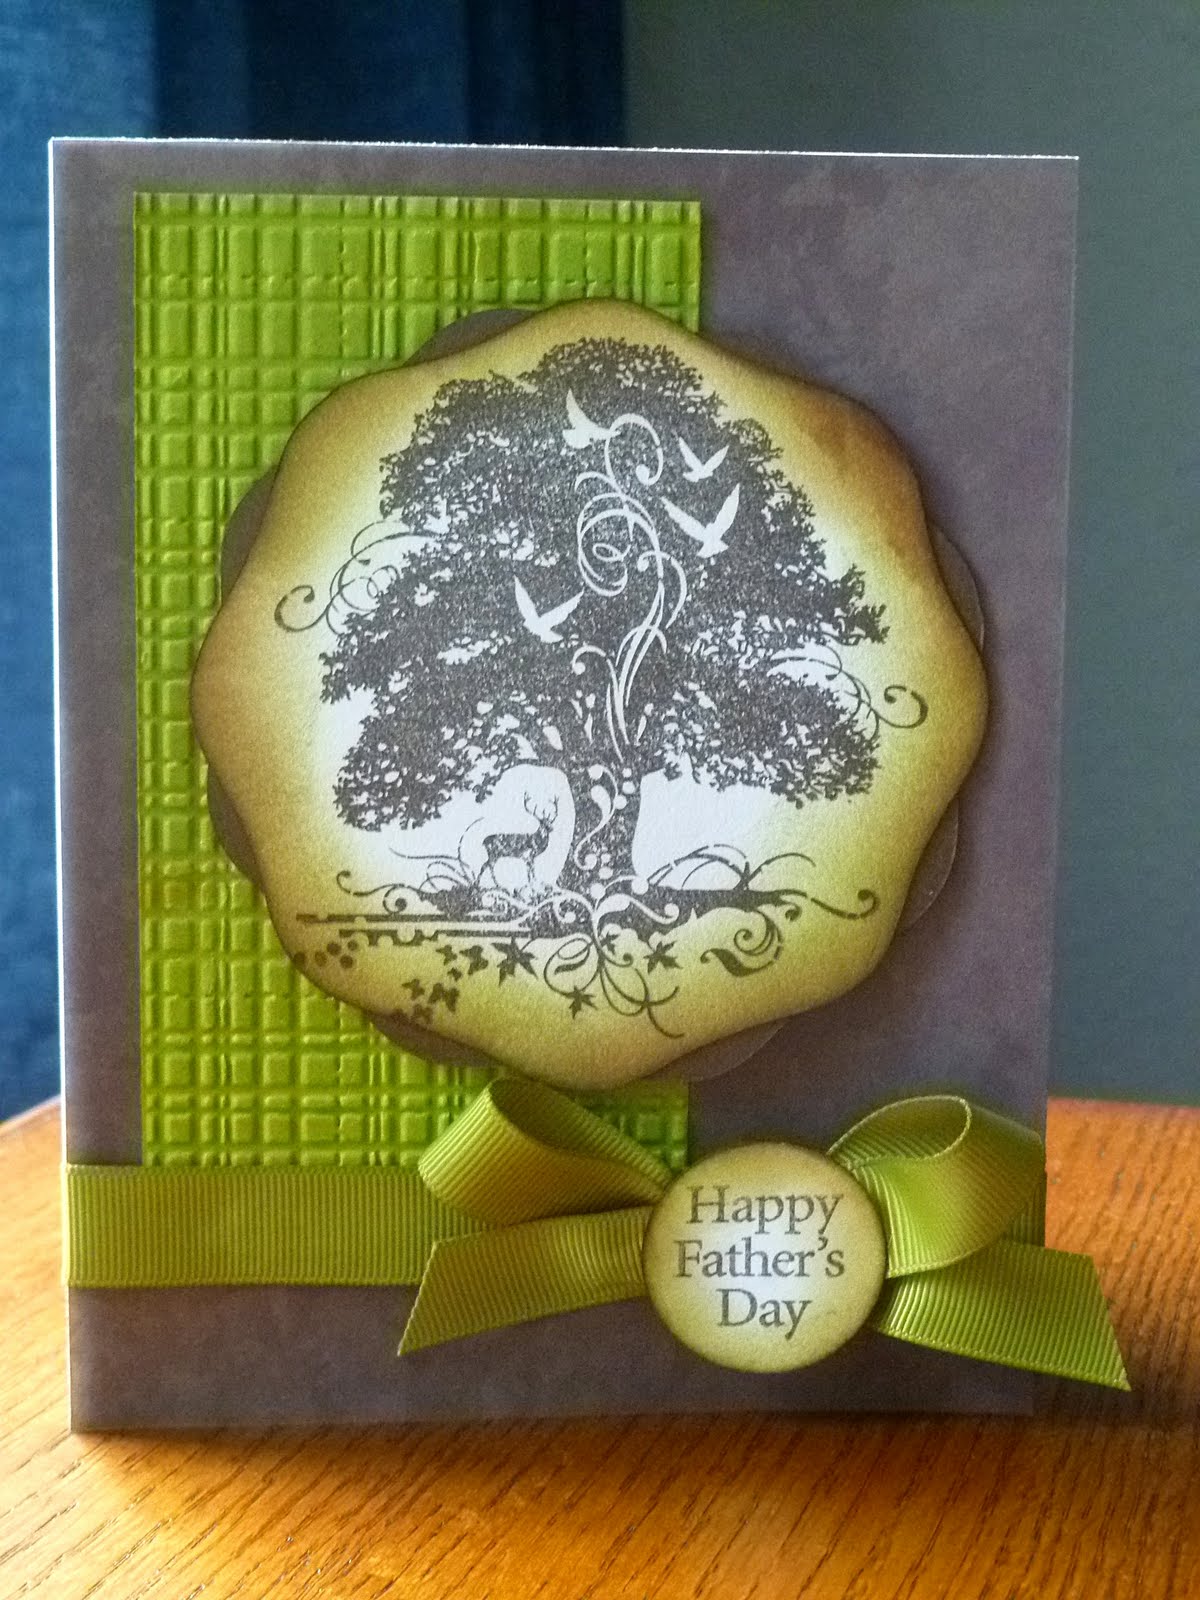
 The next card is for my dad: It is a 5" x 61/2" card.
 I stamped the image with brown Staz On ink onto white cardstock. The edges are inked with Peeled Paint, Vintage Photo, and Walnut Stain Distress Inks.
 I then mounted the stamped image on dark brown cardstock that was cut using Creative Memories Custom Cutting System.
 The green cardstock was put in a Cuttlebug embossing folder and ran it through my Cuttlebug then I spritzed it with water mixed with Perfect Pearls to give it some shimmer. (Sorry I didn't take time to get a picture where you could see the shimmer.)
The card front is covered with a dark brown pattern paper. After adhereing the green embossed paper strip to the dark brown pattern paper I wrapped a piece of Simple Chartreuse grosgrain ribbon from Papertrey Ink around the dark brown pattern paper then adhered it to the card front. I also made a bow from the ribbon and attached it with a couple of glue dots. After stamping the sentiment, Happy Father's Day on a white cardstock circle and inked it with Peeled Paint, Vintage Photo and Walunt Stain and adhered it to the middle of the ribbon.
If you double click on the photos you can see them better.

Saturday, June 4, 2011

June Blooms

We have been complaining about all the rain this spring but when I look out at my garden I can't help but grab my camera and try to capture the beauty of all the gorgeous blooms. I took these after it had stopped raining and the colors seemed so intense.
I have three bushes of these red azaleas and all three are covered in blooms.


My mom had a bunch of these purple irises along our driveway and I can remember stopping to inhale their sweet scent in the afternoon after school. I always thought they smelled like grape kool aid their scent was so sweet.
My purple Rhody is full of blooms too. It isn't a big bush but the clusters of blooms are huge this year.

Remember to take time to stop and smell the flowers.


Thursday, June 2, 2011

Finally Something Crafty

I finally have a card to share with you today!
 I made these thank you cards for my husbands retirement from serving 30 years in the United States Coast Guard. I had to make quite a few so I wanted them to be fairly simple.
 I used Spellbinders Large Rectangles Nestabilities and my cuttlebug to emboss the card with a rectangle.

 Next I punched a large red star and a small blue star with Spellbinders Star Nestabilities and adhered the blue star to the middle of the red star. I then used a cuttlebug embossing folder to emboss both stars together.
Here is what the stars looked like after spraying them with a mixture of Perfect Pearls and water.  After the stars were dry I adhered them to the upper left corner of the embossed rectangle on the card.  I then stamped thank you in red inside the embossed rectangle.
I love how you can just emboss with Spellbinders to frame your sentiment. This is the first time I have done it and really am pleased with the results and how easy it was. Here is a tip: I used a couple of tiny bits of scotch tape to hold the die in place while cutting.
It was also the first time I had layered shaped pieces together and embossed them at once. I really like the look.
If you would like you can share something new you have tried and tell me if it is something you would like to do again.

Tuesday, May 31, 2011

New Item in My Etsy Shop


Finally have a new item in our Etsy shop! You can go here http://www.etsy.com/listing/75128351/a-designers-eye-for-scrapbooking-with to check it out.

 This is a book from Ali Edwards, a well known scrapbooker on how to use and design with pattern paper on your scrapbook pages.
 Ali shares her design principles along with how to chose the perfect pattern paper for your pages, how to mix and match pattern paper as well as how to create stunning pages with scraps from your stash.
 There are six chapters, each chapter covers a certain pattern (circles, stripes, florals etc.).
At the end of each chapter there is a bullet type summary that highlights what is taught in that chapter.

Ali and four other well known scrapbookers have shared their layouts in the book that demonstrates what is talked about in each chapter.


In the back of the book eight pages of pattern paper is included for you to use on your scrapbook pages.

I highly recommend this book. Before I read the book I rarely used my pattern paper as I was afraid I would lose my photos in all the pattern paper. Now I use my beautiful pattern paper all the time and my photos are still the star of my scrapbook pages.

Friday, May 13, 2011

Spring Inspiration

I have been enjoying the flowers in my garden so much that I had to share them with you.

I'll start with my flower garden in the front:

 It has been rare this spring to see blue skies so it was just so wonderful to have a sunny day that I had to take a picture of it.
 This orange lily was planted last year so I am happy it made it through the winter.
 I was thrilled to see that my lilac bush has buds. It didn't bloom last spring. I really missed its old fashioned blooms and heavenly scent last spring. I can hardly wait for it to bloom!
These orange tulips were planted the first year we moved here. That was 11 years ago. 
Here is a close up of the orange tulips. They are opened a bit more in this photo.
 There are three of these purple tulips and the pink and white one. I didn't know they were there until one fall I really trimmed the bush back that you see in the background and the next spring these tulips showed up. They had been covered all these years by the bush and never had enough sun to grow. So they were a nice surprise.
Some random tulips mixed in with the iris.
And here is the same tulips from another angle.

Now a few pictures from the garden in the backyard:
 I also planted these tulips when we first moved in. I love that they were a mixture of color . Those red an yellow ones are my favorite.
This tulip is so sweet.
 Well this wraps it up. I hope you enjoyed the spring show and get a little inspiration from all the colors.

I would like to know what your favorite spring flower is.