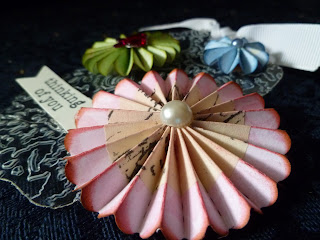
I think I am going to have a hard time giving these tags away. They are just so pretty to look at.
I was able to use lots of old stuff on my tags and that always makes me happy. The paper is an old set of CM paper which I used a lot but still have several sheets left. I kind of did things my own way and I am thrilled how they turned out.
I also found out on the rosettes if you make it shorter you will have fewer "petals" making them farther apart. If you make the width narrower or wider that changes the width of the flower.
I liked the results of using a hole punch on every other scallop. It takes a little more time but adds more interest. I used vanilla cardstock to back the acetate and a ribbon that matched the cardstock. I really like the shape of this tag.
Jennifer also had us use a narrow strip on one end of the rosettes and also some of the metal tape. The metal tape is one of the few things I actually purchased for this class. It really makes a classy rosette. Like Jennifer I have had vellum paper sitting around and I just never take the time to use even though I love the look it creates. So it was fun using vellum with an embossing folder then backing it with the acetate to provide support.
I inked the edges of the banner and rosette with Dusty Concord distress ink. It was my first time using it. I love purple but just don't seem to use it much in my card making or scrapbooking.
The banner die cut I used are from Papertrey Ink and I had cut a bunch out of white cardstock just to have on hand so all I had to do was trim it down to the size I needed, stamp and ink the edges for a quick sentiment

For this tag I used a Tim Holtz embossing folder to emboss the acetate and I chose to use the tape on the pink flower (another item I purchased for the class) and I really love how it gave a vintage, distressed look to the rosette. I think the tape will be an item I will be using quite often now.
If you notice the blue rosette is one that I made shorter so it's "petals" a farther apart. I used different colored pearl centers on each rosette and one is a butterfly.
I can't wait to go to the gallery and see what tags my classmates have created! You are all so talented and creative.


love these tags (I'm a fellow member of this class and saw the link in the gallery) - beautiful! I have not had a chance to play yet, but enjoyed looking at your projects.
ReplyDeleteLove these rosettes! They are lovely and I can see why you'd have a hard time giving them away!
ReplyDelete