Monday, July 15, 2013

Romance & Classic

 Hello my Creative Friends!
I have two cards for you today. My first card is a classic black and white.
The sketch is from CAS(E) This Sketch #36  It is such a sweet sketch that I just couldn't pass it up.
I decided on black and white because all of my cards of late have been very colorful so I thought I would change it up. It just so happens that Flourishes has a birthday celebration going on to celebrate their sixth birthday and will have several challenges going on this week and the first challenge is to create a black and white project. Perfect for my color scheme!
On white cardstock I stamped the pretty frame in Tuxedo Black Memento ink. The frame is from Inakadinkado: Expressions. I then embossed the white cardstock with the Swiss Dots Embossing folder. I matted it then with a black  mat and adhered it to the card base with pop up dots. The sentiment is from Hero Arts- Heart Flowers. I stamped it on black cardstock with Watermark Versamark ink  and embossed with white embossing powder,
.
The little bird is a pillow sticker and is from Studio 112.
I stamped the frame on the inside of the card and stamped "Make a wish" with a Studio G stamp. I used another pillow sticker bird and the "Happy Birthday" is from The Paper Studio- Cupcakes.
I used a black Glaze pen on the candle so it is shiny. I couldn't get it to show up in photos.
I even stamped the frame on the front of the envelope too.

For my second card I did another classic type card. This time I went with white and gold. 
My inspiration for this card came from the romantic inspirational photo from The Shabby Tea Room Week 175. Isn't that a beautiful photo!
You also have to use flowers, pearls and lace.
I used this sketch from Cardabilities #79
I thought this sketch fit the inspiration photo from The Shabby Tea Room so I went with it.

 
I actually started my card with the cluster of elements I know that's kinda working backwards but I just started collecting what I thought I needed or could use.  The white paper flowers I've had forever and never used them because they were a little smashed from being in the package and just weren't that pretty. But After I inked the edges with gold ink and worked with them a bit they really turned out very pretty. Glad I kept them now. I used a big gold button. It had a shank so I had to raid my husbands tool box to find something to cut off the shank so the button would lie flat. I attached the button to a white  lace bow. The butterfly is stamped on vellum paper with gold ink and I embossed it with gold embossing powder then die cut it out. I added some peals for the body. The butterfly stamp and die are from Hero Arts and Sizzix.
I also used vellum for the pine boughs that are from a Martha Stewart punch and the gold leaf was stamped on vellum too and I used gold ink and then embossed using gold embossing powder. I just love how it all turned out.
 The banner I stamped the "Mr. & Mrs." in gold ink on white cardstock and embossed it too with gold embossing powder. The white cardstock was embossed with an embossing folder and then inked lightly with gold ink and then matted on gold shimmer paper. I rounded all the corners too.

Thanks so  much for the visit and I hope you come back again!

Teresa

Saturday, July 13, 2013

Verve Sketch and Shabby Tea Room Challenge

Hello Friends! This card today is sort of an artsy card. (well for me anyway) I used paint instead of ink and I am really pleased with the results. It isn't a new technique just new to me. I have always loved the look of a sentiment stamped over a swipe of paint and yesterday I finally took the plunge and tried it.

 For the color inspiration I used the pretty photo from The Shabby Tea Room, Cherry Pie
 The white kitchen with red accents is so fresh. I also took green from the plant and pretty blue from the glass jars.

 The chipboard flower was painted in Barn Door Distress ink the center of the flower is Broken China. I covered both in Ultra Thick Embossing Enamel. (UTEE) This stuff is awesome! I have had this jar of UTEE for several years and this is the first time I have used it. I used about three layers of the UTEE. After it had dried I decided to use some light blue seed beads in the center of the flower so I added Glossy Accent to the center and added the beads then let it dry. I cut a short piece of green  ribbon from Papertrey Ink cut the ends and folded it and adhered it behind the flower.
I took Pool Acrylic Paint Dabber from Adirondack, another product I've had for several years and never used. I poured a very small amount on my craft sheet and used a foam brush to paint white cardstock. I then stamped my Sentiment from Verve with Versamark Watermark ink and embossed it with white embossing powder. Then cut it out using  a Spellbinder's die. I adhered it to the card with pop up dots .
I love the pretty floral print from DCWV Matstack, Citrus. It had all the colors from the inspirational photo. I then matted it with blue and red cardstock so it would stand out more.
I couldn't resist using the foam paint brush and Pool acrylic paint to paint the edges of the white card base. The red cardstock background was embossed with a Cuttlebug embossing folder.

Thanks so much for dropping by!

Teresa

Friday, July 12, 2013

Hurricane Ridge

We have been having a terrific summer so far here in the Pacific Northwest. On Wednesday we decided to head to the mountains and enjoy the wonderful weather and views from the mountain. It is only about an hour and a half drive from our house to the top of the mountain.
After hiking and enjoying a picnic lunch there we drove back down and stopped at our friends that live in the small town. We only see them about once a year. We enjoyed chatting and  catching up with each other and shared a delicious meal together before heading back home.
We both were tired but it was a good tired. All that fresh mountain air and exercise does a body good.
 The purple flowers are Lupine.
 I love how you can see the layers of mountains.
 It was so enjoyable just to sit and watch the wildflowers and grass blow in the gentle breeze and feel the warm sun.


 As you can see by my shoe choice I wasn't prepared for snow on the trail. But it was only in a few areas so it was OK.
 They have a ski lift but I think it is just cross country skiing and I think you can also sled here.
 These Avalanche Lilies were all over.
 These delicate flowers were so pretty but I don't know their name.

 From this vantage point you can see our neighbors in Canada from here.

 Here we are at Sunset Point
 Hurricane Hill and Trail our in the background.
 This is the Visitor Center from the trail and heading back to it.
 It was pretty busy as you can see from the cars. In another month it will be packed with cars and tourists.
 I watched this little guy while we sat down at a picnic table to eat our lunch.
We saw so many deer during our visit. On the way up to Hurricane Ridge we saw a mama and her little fawn who still had it's spots. He most have gotten separated from her as he was further down the road and was running full speed towards her. He looked really scared. And on our way back down the mountain we saw them again except this time he was right behind his mama. I think he learned his lesson.
I hope you all are enjoying you summer days too. 
Have a great weekend whatever you do!
Teresa
PS I am linking the first photo to Our Beautiful World. 
This week you are to post a photo that shows what summer is like where you live. This is only the second week so please go on over and check out their blog.

Thursday, July 11, 2013

It's A Circus & A Sweet Sunday Sketch

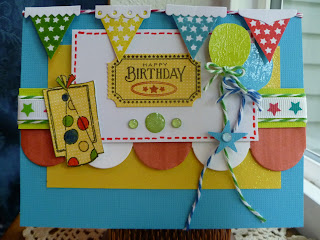
I had so much fun making the card I am sharing today. It has a circus theme with tickets, balloons, banners and bright colors.

Over at The Twinery they have a new challenge: It's A Circus- The Twinery Theme Challenge
After seeing the creations of The Twinery's Designers I really wanted to create something for the challenge. But then I realized I had nothing with a circus theme so how in the world could I create a card without circus themed stamps or papers. I almost gave up the thought until I saw the Sweet Sunday Sketch #188.

When I saw the large scalloped border it reminded me of the circus tents and that got my circus mojo going and I started gathering stamps from several different sets and went to work.
I used the party hat from a Hero Arts birthday set and colored the circles with bright colors then covered the colored circles with Glossy Accents
 I ran red and white baker's twine from the Twinery along the top edge of the card then stamped banners in Mowed Lawn, Broken China, Fired Brick distress ink and Sunflower Yellow Memento Ink then hand cut them out. The banner toppers were die cut with a Papertrey Ink die before I glued them to the baker's twine.
 The ticket is stamped with Tuxedo Black Memento ink and Fired Brick on  paper that is from DCWV Matstack Citrus. The ticket stamps are from Papertrey Ink. The three green dots are Glitter Epoxy Dot Stickers from Kathy Davis Designs
 The Happy Birthday balloons are Hero Arts stamped on cardstock with Versamark WaterMark ink and embossed with clear embossing powder. I used more baker's twine for the balloons strings and bows.
 I used a red Glaze Pen to do pen stitching around the white cardstock to add shine and dimension. I added a blue punched star with and a small blue Glittered Epoxy dot to the middle of the star. The large scalloped border is from a Papertrey Ink die. I masked off three of the scallops and colored them red with Barn Door distress marker. I then found ribbon with bright colored stars and wrapped that around a green cardstock border and outlined the star ribbon with green and white Twinery baker's twine and then layered it over the large red and white scalloped border.
I had so much fun making the card that I went all out on the envelope using the same colors and elements that were on the card.
I am also entering this card and envelope in the Make it Monday Card and Envelope Challenge. You need to make a matching envelope for your card.
Whew, I think I covered everything!
Thanks for looking!
Teresa


Wild Thing

Good morning!
I'm here to share with you all a fun anniversary card I made for my husband:
I just love all their sketches over there at Mojo Monday! Julee does a fabulous job of coming up with great sketches every week. So thank you, Julee!
Now this is my second try at this card. the first card is the same except after mulling it over in my mind I decided I hated the look of the focal image. It just did not seem to match with the fun papers so I ripped it off the card and started over. It took me the second time to get it the way I wanted but I am much happier with it now.
Here is what the first one looked like:
I had use white cardstock for the background and inked the leaves in Peeled Paint and Mowed Lawn distress inks. Then I inked the over it with Crushed Olive and Peeled Paint. Then for the cheetah I stamped the body in Scattered Straw then stamped the spots and facial features in Tuxedo Black on white cardstock. I didn't like the stark white around the cheetah so I inked the edges with Scattered Straw. The grass border is white cardstock inked with Crushed Olive and Mowed Lawn. After I put it on the card it looked out of place with fun papers. I think it was too artsy if you know what I mean. So after looking at it all evening the next day I started all over.
Here is my second try:
I am much happier with this. Not so artsy with all the ink and I did the cheetah on light yellow cardstock instead of white, stamped the leaves on light green cardstock and didn't stamp the them so close together.The grass border is the same light green cardstock as the circle. I also used a plain round circle on it and inked the edges of the larger circle with  Scattered Straw. I love it so much better. It is harder to tell the difference by the photos compared to real life but there is a big difference between the two.
I adhered the sentiment strip right onto the bottom edge of the circle . I added the heart shape over the word "heart" then added pop up dots to adhere the whole thing to card. I added the pen stitching with a red Glaze pen which adds a bit of shine and dimension.
I stamped happy anniversary in the upper left corner in Tuxedo Black ink and is from Papertrey Inks Mega Messages. The other sentiment and cheetah image are also Papertrey Ink stamps from It's a Jungle Out There. The leaf is an old stamp from Rubber Stampede.
Thanks for the visit and have a great day!
Teresa