Monday, July 16, 2012

Tea For Two

Today's card was made with a sketch from Clean and Simple Stamping and here is the sketch:
 Check out their website to see how others interpreted the sketch: http://cleanandsimplestamping.blogspot.com/2012/07/199.html
And here is my take on the sketch:
I don't think you can get much more simpler than this card. All that was used was stamps and paper but I love the way it turned out.
 The stamps and die are from Papertrey Ink, "Tea For Two" and I used Concord Grape, Peeled Paint and Faded Jeans Distress Inks. I was just going to use the white card base for the background but it seemed a little too plain. I started to play around with different colors and finally decided on the dark brown.
The brown really makes the cups pop. The sentiment is stamps on white cardstock with black ink then the ends trimmed in a v shape.
And that's it! No foam dots, inked edges and I even refrained from using perfect pearls on the cups because I  didn't want the card to be too girly.
Wishing everyone a great week!
Teresa

Sunday, July 15, 2012

{Creepy Lane}

I'm still being inspired by the Halloween papers that are sitting out on my desk and couldn't resist making another card using this Mojo Monday Sketch:
 I'm cutting it close to enter...only 4 hours left. If you would like to see more inspiration for the sketch you can see it all here: http://mojomonday.blogspot.com/2012/07/mojo-monday-249.html
Here is my little creation:

 I had such fun making my focal point. I just kept coming up with things I could add to the creepy little scene.
 I started with the wrought iron fence stamp which is from Inkadinkado. I stamped it on white CS using Versa Mark watermark ink then embossed it with black sparkle embossing powder. I used Peeled Paint Distress ink for grass on the bottom and then inked the entire white CS with Pumice Stone Distress ink. The edges are inked with Black Soot then deciding it wouldn't show up against the black mat I inked the edges with white ink from Color Box. I also inked the black CS mat with  white ink.

 I used a Creative Memories punch for the ghost, black cat and pumpkin. I inked all of the edges with black or white ink and added eyes and mouth to the ghost. The Happy Halloween sentiment is stamped onto black CS with Versa Mark watermark ink and embossed with white embossing powder. I decided a big yellow moon would add a nice touch and used the 1 1/2" circle punch from Creative Memories to punch the circle then put it halfway in the punch and punched it again to make it a crescent moon. I layered the sentiment banner over the moon and decided to add the ghost to the banner.
 I used foam adhesive on the pumpkin and the cat on the fence. I found the yellow gemstone star that has been stuck on my desk from a project several weeks ago and decided it would be the perfect finishing touch to the spooky little scene. I thought about trying to find another star but decided that it might be too much and the one star would be enough.
I know I am a bit early with the Halloween cards but I enjoy making them and several have left comments that Halloween is their favorite holiday to make cards for.
What is your favorite holiday to create cards for?
Teresa

Saturday, July 14, 2012

Magic Potion

I used this weeks sketch over at The Deconstructed Jen's for the card I am sharing with you today. It's been awhile since I've used a Deconstructed Sketch . I enjoyed playing along and seeing how others interpreted the sketch. 
Here is Jen's sketch;
 Jen has such creative sketches that makes you think out side of the box at times.
Here is what I created with the Deconstructed Sketch #60:

I had been going through some Halloween papers and had just seen a tag that was already punched and I thought to myself I need to use this, as it was made with some of my favorite pattern paper. So when I saw this sketch and I knew the two were meant for each other. I had to change the sketch from a square card to an A2 size so my card looks a bit different.
All the stamps are Studio G dollar stamps. I used Memento Tuxedo Black ink  on white CS and embossed with black embossing powder on the Magic Potion image. After cutting the image out I used Pumice Stone distress ink to color the image making the edges darker.
The Happy Halloween sentiment is stamped with the same ink but not embossed. I used a light gray CS and inked the edges with Black Soot Distress ink. I then inked the edges of all pieces of paper before adhering it altogether. I added the orange and purple gemstones to balance out the left side of the card and added ribbon and twine to the tag.

Hope you enjoyed my card and give the sketch a try over at Deconstructed  Sketches http://deconstructingjen.com/archives/6157

Teresa

Friday, July 13, 2012

Blue Floral Set

Yesterday I posted a card I made using a Freshly Made Sketch you can see the post here: http://teresazuehls.blogspot.com/2012/07/blue-floral-happy-birthday.html
Now here are the rest of the cards I made to make a set of eight note cards. I made two of each design and I used the same sketch for each card just changed up the stamps, sentiments etc.
First one  is a thank you card.

 I don't know the manufacturer of the flower stamp set. It might be Martha Stewart but I am not sure. I have had this set for several years and never used it but the packaging looks like it might have been a MS set. Any how I though the stamps matched the flowers on the card pretty well.
 I used Faded Jeans distress ink and for the get well sentiment I used Versa Mark watermark ink with white embossing powder.
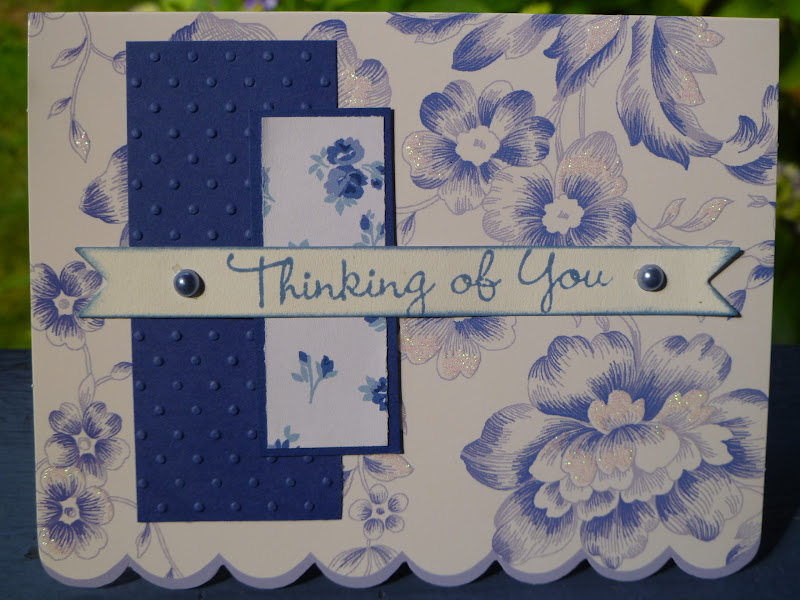
 I just love the sparkle on the flowers. I think you can see the glitter really well in this photo.
 To get better ink coverage on the large flower stamp I first stamped my flower stamp in Versa Mark  watermark ink then in Faded Jeans distress ink then stamped the image in white paper.
 The "thinking of you" is the last of the set. I even emossed the flap of the envelopes with the Swiss Dots embossing folder and stamped a small flower on the front.
Enjoy!
Teresa

Summer Blooms

I was out in my garden the other day just taking in the beauty of the summer blooms and thought I would share them with my fellow bloggers.
Enjoy!


This flower is the creation of a talented friend who makes them from assorted dishes. They are gorgeous and I will have to add to this lonely one.


Hope you enjoyed your photo journey through my garden.
Teresa

Thursday, July 12, 2012

Blue Floral Happy Birthday

Freshly Made sketches came out with this CAS sketch and is designed by Tui:
 here is the link:http://freshlymadesketches.blogspot.com/2012/07/freshly-made-sketches-43-sketch-by-tui.html
The "Clean Team really out did themselves this week with their "Fresh Made" creations. You really need to check them out and see for yourself how amazing their cards are. I promise you won't be disappointed.
Here is my humble little card:
 I feel like I kind of cheated and here is why: I like to go to the dollar section at Michael's because sometimes they have such pretty note cards without any sentiments on the front. When I get them home I like to decorate them and add a sentiment.. That is what this pretty little floral card is. It already had the scalloped edge and the flower print. I just added the paper strips and stamped the flourish and the happy birthday.
 The best part is that they also had 6x6 pattern paper to match the cards. I also love that the glitter is already on the flowers and I don't have to deal with glitter all over.
I wanted to add some clear gemstones but couldn't find them. Then I remembered I had some blue pearls and used them instead.
My aunt has a birthday coming up and her favorite color is blue so I am making a set of eight of these note cards for her. I will use four different sentiments and stamps but keep the sketch the same.
Have a good evening.
Teresa

Sunday, July 8, 2012

{Spooky}

Here is a fun sketch from Freshly Made Sketches that will use up a few scraps. The sketch is from Jennifer T. a Design Team Member. Check what the other Design Team Members did with the sketch: http://freshlymadesketches.blogspot.com/2012/07/freshly-made-sketches-42-sketch-by.html
 Now here is the card I created with the sketch:
When I saw the long vertical focal mat I knew exactly what stamp I would use. The Halloween cat was perfect. I have another stamp I want to use with this sketch but that will have to wait for another day.
The stamps are all Studio G dollar stamps and the ink is Memento Tuxedo Black.
 I used an EK Success punch to punch out the Happy.
Now for those of you that may be wondering why I am already making Halloween cards, I am making them to send to our military overseas. So you will be seeing a lot more fall cards over the next few days.
Hope you are enjoying lovely summer days!
Teresa

Saturday, July 7, 2012

So Thankful For You

I just ran across  a new blog  by Jen Del Muro. Jen makes a sketch as a challenge for each month and I decided to give it a try and play along.
Here is her sketch:
And you can find her blog and sketch challenge for July here: http://iheart2stamp.com/2012/07/07/july-sketch-for-you-to-try-2/
Now here is the card I came up with using Jen's sketch:
 
 The papers I used were all from scraps...even the scalloped circle with the sentiment was something that I had leftover from making Thanksgiving cards s couple of years ago. You might see it a few more times as I still have a couple  more left.
 For the horizontal border I just had to layer the scraps and trim a bit off the ends. I cut a v in the vertical strip and that was it. My borders were made.
 The scalloped circle is adhered with pop up dots and for some reason I had to put it up closer to the top of the card than what the sketch showed. The circle just did not looked balanced when placed lower on the border as it was on the sketch
I am happy with this card for two reasons. First it was made all from scraps except for the card base and secondly it is purple. I really do love purple but rarely use it in my cards.
Note to self: need to use purple more!
I hope you visit Jen's blog and give her sketch a try.
Teresa

Tuesday, June 26, 2012

Masculine Birthday Wishes

This is the card I made for my dad's 82nd birthday last week:

 When I saw this sketch over at Freshly Made Sketches (You can find it here http://freshlymadesketches.blogspot.com/2012/06/freshly-made-sketches-39-sketch-from.html ) .
...and this card by Clean Team Designer, Jennifer Brum...

...I knew it would make the perfect birthday card for my dad.
 The numbers were made from orange cardstock die cut with my Cuttlebug and then I used Glossy Accent to make them shiny and add a bit of depth. The background is white cardstock embossed with a Tim Holtz embossing folder and layered on a brown cardstock mat.
The watch image is from  Studio G and is stamped on white cardstock with Vingtage Photo Distress ink then cut out. The smaller circle is cut from white cardstock and I used a chevron mask with Spiced Marmalade Distress ink. I then inked the edges with both the Spiced Marmalade and Vintage Photo and cut a larger brown circle to mat it. 

 Birthday Wishes is stamped on white cardstock that I then cut into a ribbon and inked the edges with both distress inks and adhered it to the circle with foam dots.
The striped pattern paper is from DCWV. I love this paper and I had to get a close up to show you how glossy it is. It also has a bit of glitter but not too much.

I hope to get back in the swing of creating cards next week. I have missed getting ink on my hands :)
Teresa

Back Home Again

It has been a busy two weeks for us with our oldest gradutating from college and two camping trips. Now it is back to catching up around the house and doing all the laundry that accumulated from camping.
Here are some pics from our camping:
This was at Ike Kinswa State Park. The lake is Mayfield.
It is a beautiful lake and we saw lots of deer.
 I thought these trees looked pretty with the moss hanging from the branches.
 A close up of the moss.
 Nanook exploring the water. He is so much like a kid when it comes to the water. So hard to keep him out of it.
Nanook exploring around the lake!
This is the way he waits for us to throw the stick into the water. Unfortunately he drops the stick about two feet from us in the water. Just out of our reach most of the time unless we want to get our feet wet.
We took a drive to Mossy Rock and visited the Mossy Rock Dam.
To get to the view point of the dam we had to drive down a small country road. Along the drive we came across five big birds all in a row down the middle of  the road. We got a photo of one and decided they were some kind of vulture.

Here are the pics from last weekend at American Lake:

The campsites were small but we had everything we needed.
We even had a small view of the lake.
There was a one lonely rose bush to brighten our site.
It was nice to have a little color since it was cloudy and wet the first day.
We did have some sun and a wonderful barbeque with three other couples.
One tired old dog at the end of a day of camping.
I will be back soon to share a card I made last week. Yes, I did manage to squeeze in a quick card.
Hope everyone is enjoying their summer.

Teresa