Saturday, June 8, 2013

Birthday Wishes for Dad

Hello! I'm here with another masculine card. This time it is for my dad's birthday.  I really am thrilled with the way it turned out but boy was it a pain in the behind to get it started. Once I got the mojo going it finally started to flow and fall in place.
 I used the sketch Mojo Monday #296:
Oh, I almost forgot I am also entering this in the  It's A Man's Man's Man's World Challenge from A Blog Named Hero. You are to make a masculine card for the man or boy in your life.
I had a really hard time getting the three circles to work with the horse image, which by the way is an old Hero Arts stamp that I have had around for a long time. Any way I almost gave up on the A2 card and try a  larger size but then I got the idea to turn the card. Dah! I just didn't use the two vertical strips in the sketch.
I scrounged through my box of scraps to see if I had any circles the right size and color. I found the green pattern paper circle then the scalloped frame which fit it perfectly.
For the horse I stamped it in Memento Tuxedo Black inkon white cardstock. I used Antique Linen, Tea Dye and Vintage Photo distress ink to color the horse image. After it was inked I spritzed it with water to blend the inks.
 
 In the scrap box I also found a dark green circle frame the same size as the scalloped frame and decided to use it as the second circle. For the third circle I stamped the word Dad onto kraft cardstock and inked the edges with Vintage Photo ink.  The background of the card is kraft cardstock and ran it through the Cuttlebug with an embossing folder so that it looks like wood grain. I then Vintage Photo.
 I had planned on using the horseshoe on the small circle but it just didn't work so I traded the spot where I was going to put the word dad and it seemed to work that way. I made the horseshoe by stamping it on kraft cardstock with VersaMark Watermark ink then used silver embossing powder. I left a bit of the kraft paper showing when I cut the horse shoe out then inked the edges with Vintage Photo Distress ink.
 I have a couple quick tips I'd like to share with you all today. To start the holes for the brads I used on my card today I used a thumbtack. To keep the thumbtack handy and where I will always know where to find it I just store it  right with my brads. Can you find it in with the brads?
Tip # 2 is my scarp box where I keep all of my leftover shapes that I either made too many of or they just didn't work for the intended project. I keep each shape in a sandwich bag  So if I am looking for hexagons I just grab the bag with the hexagons. It is so much easier than going through the box with everything just all jumbled together.

Well, that is it for tonight. Hope your all having a wonderful weekend!
Teresa

Festive Birthday

We have a friend that is having his 50th birthday this month so I made this festive birthday card for the occasion:
I really love how it turned out so fun and cheery. The sketch was great to work with and I loved the banners at the bottom. Very appropriate for a birthday card don't you think? You can find the sketch at Freshly Made Sketches.
 
I am also going to enter this card in A Blog Named Hero Challenge  called It's a Man's Man's Man's World. I think June is a great month to honor men since it is Father's Day. The challenge is just simply to make a masculine card or project for the man or boy in your life.
Well mine is for a friend but I also need to make a card for my dad who's birthday is later this month too.
I cut the 50th using dies and blue cardstock. I then covered the letters and numbers with Glossy Accents to give shine and dimension. Then I stamped happy on the white cardstock with Fired Brick distress ink. The background was embossed using the Numbers embossing folder on a light yellow cardstock and matted with red.
 I hand cut several banners using plain cardstock and pattern paper from DCWV matstack "A Type of Art" and used pop up dots. The main background pattern paper is also from the same matstack. I then used baker's twine to wrap the background and made a simple bow.
 On the inside I used a piece of scrap left from the background pattern paper and stamped the party hat on the light yellow cardstock, hand cut it out and colored the circles with Fired Brick and Broken China distress markers. I stamped the sentiment in black ink and colored it too with the distress markers.
 Like I said before I love how this card turned out so fun and festive and it also came together so easily. It really is fun to create when things come together the first time.
Thanks for the visit and have a wonderful weekend!

Teresa


Friday, June 7, 2013

Mixed Media Project

OK, here it is finally, my first mixed media project!
 (Click on the photos and you will be able to see it larger)
Wish I could get a better picture of it. Here is the story on how it all came to being. 
For weeks I kept seeing this pretty piece of 12x12 paper that only had a piece of the bottom right corner torn off that had  been used for a small project about two years ago. It kept playing in my head that I could do something really cool with it but just put that thought on the back burner. Then I came across a 12x12 canvas in my stash and thought I could use the canvas with the paper and come up with something kinda cool. But I was too scared to start as I had no idea what I was going to do. So a few nights ago I got brave and just jumped right in with really no plans except the paper and canvas
First step was to paint the canvas green. I really didn't want this bright of green but it was all I had so I went with it.
After the canvas was painted and dried with a heat gun I then tore the paper in half and used Mod Podge to adhere it to the canvas and then covered the whole canvas and top of the paper with Mod Podge. This I let sit overnight.
 
Next I thought I would try out stencils and Molding Paste. I laid the stencil where I wanted it then took one of those fake plastic credit cards (that come in the mail every other day) and put a teaspoon or more on the credit card and ran it over the stencil. I used Golden Artist Color Light Molding Paste in case your wondering. Then I let that dry for most of the day which gave me time to think about what I wanted to do next.
 

I decided to add color to the Molding Paste and used Mustard Seed distress ink applied with the inking tool.
Here is a close up so you can see how thick the molding paste is. It's not too thick but yet it gives great dimension.
I used Scarlet Tattered Angels Glimmer Mist after I laid the bird stencil back down over the dried molding paste and spritzed a few times. The glimmer mist turned the yellow distress ink orange which was fine with me.I think the red would have been too dark. Next time I will try coloring the Molding Paste before applying it.
Here is a close up of the bird after it was misted.
I decided to use stamps next so I gathered a bunch of different stamps and started stamping with Memento Tuxedo Black and Red

I just kept stamping until I felt like it was balanced and done. I really had fun with this part. It really doesn't matter if the stamping isn't perfect so there is no pressure there. Although I did put a small pack of cardstock under the canvas where I was stamping to give me a better surface to stamp on. This is what it looked like when I was done.
 
I continued stamping a few words under the bird in Tuxedo Black. At this point I am almost done. All I have left is to make some daisies.
I used a punch to punch the six white daisies. I wanted them to be red and white so I stamped Fired Brick distress ink right onto my craft sheet and spritzed with a bit of water before dragging each flower through the ink. I tried using Picket Fence Distress Stain by putting it directly on my craft mat just like the distress ink then drug the red inked flowers through the Picket Fence stain. I didn't really like the look so I only did a few that way. It took away the vibrant red and made the flowers to light. I also took a dry embossing tool and rolled it around the middle of each flower while on a soft mouse pad to curl up the petals. Next I used three shades of brown cardstock ran it through the cuttelbug with the Swiss Dot embossing folders then punched out circles to use as the middle of the daisies.
  
I spritzed the finished flowers with Gold Perfect Pearls for a little glimmer. Here you can see a bit of the glimmer from the Perfect Pearls.
 
I used a Fiskar border punch and green pattern paper to make a grass border under the paper. I inked the grass border with Walnut Stain Distress ink before adhering the grass with Mod Podge. I then applied Mod Podge over the top of  the grass border and let it dry.
 
Last but not least I adhered the flowers randomly to the canvas around the lady and along the grass. By the way the grass border and the flowers pretty much cover up the missing torn paper.
If you are still with me through all that :) thanks for staying to the end for I know it was a  long post.
If you have done a mixed media project leave me a link to it as I would love to see it.
Thanks for your visit!

Teresa


Thursday, June 6, 2013

Butterfly Congratulations

Last night I made another graduation card. Definitely not my favorite creation but here it is anyway:

I used ColourQ Challenge #192 for color inspiration:

and Retro Sketch #66:
I stamped the  butterfly image on sticky back canvas with Versamark Watermark ink and embossed with white embossing powder then inked the canvas with Shabby Shutters, Pumice Stone distress ink and Ocean Depth VersaMagic Chalk ink then spritzed it with Gold Perfect Pearls. I then mounted the canvas to dark gray cardstock and ran the whole thing through the Cuttlebug using Swiss Dot embossing folder.
 For the sky blue I used the softest blue cardstock I had to go under the butterfly piece. It just didn't look good at so I ran it through the cuttlebug using a swirly embossing folder then Spritzed it with gold Perfect Pearls and inked the edges with Pumice Stone. Inking the edges really helped blend in the blue paper to the card.
I tried to show the sparkle on the blue cardstock from the Gold Perfect Pearls but it is really hard to pick up with the camera. 
The cardstock wrapped with the baker's twine was a piece that I had made to use on another card that ended up not working for that project but was able to use it for this card. I stamped the congratulations on white cardstock with the Ocean Depth ink and also the edges.
 
I didn't really have the right colors of the ColourQ so I used what I thought matched the best. The Ocean Depth came out lighter on the sticky back canvas than what I wanted it to be. Shabby Shutters was used for the Certainly Celery, Pumice Stone for the Going Gray and Ocean depth for Island Indigo. Let me tell you these color challenges are really challenging for me. I don't use gray much in my cardmaking but I have to admit I  really like it when I do.
Last night I finished my mixed media project that I promised you all and will post it later. 
Not sure if I'm liking how it turned out but I will say it was fun to make something just for me and not really worry too much about how it turns out. It was a fun learning experience and a way to use new products.
So be on the look out for it coming up soon!

Wednesday, June 5, 2013

Growing Herbs and Vegtables

What a beautiful day! It was one of those days that you wished would last forever. I had to take my husband to Home Depot for a few staining supplies so he can finish a couple of doors that he is replacing upstairs. I had to drive since he is nursing a very sore back that has been out since last Thursday. He has been to the emergency room on Friday where they gave him muscle relaxers, pain pills and steroids. Then yesterday he saw his doctor who took x-rays and gave him different pain pills that he could take during the day that wouldn't make him so sleepy. I think he getting a bit more movement back but I think it is going to be a while before he is back to his old self.
So any way back to my story: I told Wayne I was just going to pick up some fertilizer for my outdoor plants while he was getting his stuff. Well, I was amazed at how many more plants Home Depot has since the last time I had been there. So I found myself browsing around the aisles and aisles of plants then then the next thing I know I have a cart and filling it with plants and a big bag of organic potting soil. I ended up getting Sweet Basil, Oregano, Cilantro and an orange pepper plant.
 I decided to plant them all in one big pot and see how they do.
 The little pepper plant has eight little peppers already starting to set on. I am hoping the slugs do not like peppers.I have such a hard time with those nasty critters eating some of my plants.

 I tried planting some carrots last summer from seeds and they did come up but I think we planted them to late in the season and I just dropped them in the soil which where I planted them was pretty much just sand. Although I do know carrots like sandy soil I just think they needed a little something else added in. Any way some came back this summer and the tops were about two feet tall so I pulled a couple today just to see what was growing.
Well,it wasn't much. I think the poor carrots were missing some nutrients and they were a little soft and maybe they had too much water this spring since the side was split on two of the three plants I pulled.
 So I ended up just putting them in the compost pile. If  I try carrots again I will add something to the sand and plant at the proper time. At least I know they will grow.
And since I am on the subject of gardening I might as well post the photos of my azaleas that bloomed so well this year and my purple rody.
 These red azaleas bloomed profusely and so did my pink and white ones.

 The azaleas were so heavy with blooms that I'm surprised they could hold up their branches. Sadly now they are all done blooming and their pretty petals are littering the ground with their prettiness.

 This is in our garden in the backyard.
 All of  my other iris are purple except for this one.
 The bees seem to love my flowers and we also have lots of butterflies.
i 
Right now I am working on a special project that I hope to have done in the next couple of days. Although I might not be brave enough to post it. It is mixed media and it took me several days maybe even weeks just to get up the nerve to start. So I'll just have to wait and see whether it is something worthy to appear in blogland.
Teresa

Sunday, June 2, 2013

Peacock Feathers, Broken China, Shabby Shutters...

...are some of my favorite Tim Holtz distress inks! Of course I really do love all of his ink colors but these three are really gorgeous together.
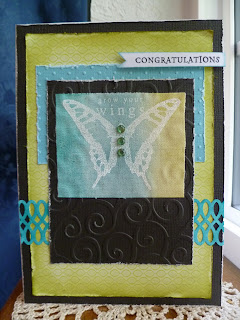
I made this card yesterday using those three colors:
 My goodness, June is a busy card month isn't it? Between graduation, birthdays and Father's Day I keep very busy making cards. I am so thankful for those who create sketches for us to use as inspiration. They are such a quick way to get the creative juices flowing.
When I saw this sketch from My Favorite Sketch Challenge I knew it was perfect for a graduation card I needed to make.
I started with a piece of sticky back canvas and Grow Your Wings butterfly Itty Bitty stamp from Unity. I inked it with Versamark Watermark ink and stamped it on the sticky back canvas and dried it with the heat gun. The Versamark Watermark ink creates a resist for the ink. Next I inked the canvas with the three colors of ink using the inking tool.  I distressed all the edges of papers and decided all the cardstock except for the black background for the base of the card needed to be dry embossed. I used my two favorite embossing folders: Swiss Dots and the swirly folder (can't remember it's real name). The card was coming together quite nicely but something was missing. Even the pattern paper didn't give it the boost I was hoping for. Going on I punched the loopy double border from Martha Stewart from white cardstock then inked it with Peacock Feathers.
The sentiment is stamped on white cardstock with black in then the edges are inked with Broken China. I still thought it was lacking something. So When all else fails add more ink :) which is what I did. I inked up the green pattern paper with Peeled Paint and when I layered it all back together it was all good. So I adhered it all together.
For the inside I used a journaling card, inked the edges with Broken China, stamped Happy Graduation in black at the top then added the dreams sticker. I had to use a 5x7" card to get everything to fit nicely. I usually use the A2 size but the butterfly image was a bit too big for the A2. 
I always feel really artsy when I get to use and play with a lot of ink and sticky back canvas!
One grad card down and one more to go.

Teresa

Saturday, June 1, 2013

You Are My Anchor

Here is a little weekend inspiration this morning. I have found if I get up a little earlier in the morning I can get in more and better crafting time. Also I seem to have better creative mojo in the mornings than in the evening. By the time I am done for the day and have time to work on cards sometimes I am just too tired to be creative. Plus I can see  colors better in the sunlight verses artificial light.
Here is my Father's Day card for my husband:
I used this pretty sketch from Cardabilities.
.
 I stayed with the black, gray and white color scheme that I used for my dad's card, A True Classic as I really love the crisp and classy look of these colors together.
 I used my lovely new Verve Stamps and die. I stamped the rope circle on a journal card with black ink then die cut it with a Spellbinder die. I backed it with pattern paper & die cut with a larger die. The scalloped strips are scraps that worked perfectly for the sketch. And you can see I was able to work in a little baker's twine in keeping with my self imposed challenge to use it verses just letting it sit and look pretty on my shelf. LOL. The anchor was stamped in watermark ink and embossed with silver embossing powder then die cut. I inked all the edges with black ink to give more definition between the layers.
 I stamped the sentiment in black ink and embossed with clear embossing powder. The "Happy Father's Day" sentiment is stamped with watermark ink and embossed with silver
 I used some of the leftover paper to decorate the inside. I have started to do this on the inside of my cards since it not only looks nice but is a good way to use up scraps. It's not that fancy but it does add a bit of niceness on the inside and gives a bit of continuity to the card.

Well, that is all I have for today. The sun is out so I think I will work outside today and get caught up in my gardens.
Thanks for the visit and Happy Weekend to you all!

Teresa