Saturday, July 21, 2012

Feel Better Soon

Finally I found time to make a card using this wonderful sketch from Mojo Monday #250. I have been dying all week to use it and today was THE day!
Here is the sketch:
 And this is what I put together.:
 Now this type of sketch is not easy for me since I am more of a CAS person but the all the banners lured me to the sketch 'cause I seem to like banners. 
I started out with the bottom layers and worked my way to the top then I picked my stamps and embellishments last. Usually I start with my stamp images and work from there but today was different.
The paper is all from DCWV Citrus Matstack. It has such vibrant colors and pretty floral prints.
 I knew I was making this a get well card so I picked Tea For Two stamp set from Papertrey Ink and used the teapot die that matches the stamp. Well I ended up die cutting the paper from the wrong side but actually that worked out because I wanted the teapot to face towards the right side of the card not the left. But that posed another problem. That meant I couldn't use the matching stamp because now it was going the wrong way. Now what was I to do! So I came up with idea to ink the edges of the teapot with Spiced Marmalade then added pen stitching. I'm still not happy with the teapot I may try to find something else to add to it. Maybe a small flower or something.
 The doily stamp is also Papertrey Ink and I stamped it with Broken China onto white cardstock than inked it with Tumbled Glass distress ink before fussy cutting it out and cutting it in half. I die cut and embossed a white cardstock circle and inked the edges with Spiced Marmalade.
 The sentiment is stamped with Versa Mark watermark ink and embossed with black sparkle embossing powder. I fussy cut a flower from some of the pattern paper and  made ribbon leaves for it. I just learned how to make them from the sweet Melisa Phillips blog:http://lilybeanpaperie.typepad.com/lilybeans_paperie/2012/07/stamp-a-faire-ribbon-techniques.html
She has a video on how to make three different ribbon leaves. Please visit her blog to watch her short video. I have had a small piece of ribbon floating around my desk for about a month that I just couldn't bear to throw away. Imagine how great I felt when I got to use it on my card today!!
I used foam adhesives to adhere the teapot to the doilie and white circle to add some dimension to the card.
 I have nodded off a couple of times now so I need to get this posted before I fall asleep at the computer :).
Hope everyone is enjoying family time and having a wonderful weekend.
Teresa

Thursday, July 19, 2012

A Note of Thanks

Good morning! I have a card to share. I used this sketch for my card which I think has unlimited possibilities!
Here is where you can find the sketch: http://ispysketches.blogspot.com/2012/07/issc24-shari-carroll.html
 This is what I created with the I Spy Sketch:
 I decided on four colors one being neutral which is the gray. I first started with hexagons but didn't like how it was going and switched to circles. I embossed each circle with a Cuttlebug embossing folder. I first tried a white background but the colors of the circles just didn't seem to stand out like I wanted them to so switched it to black and that seemed to make the colors pop.
 I added the sentiment which is from Papertrey Ink "Happy Trails" towards the bottom third of the card.
 
The five butterfly shapes are a Martha Stewart punch punched out from white cardstock then added teeny tiny black gemstones  for their bodies.
I only had enough black gemstones for four butterflies so I decided to use gray gemstones on two of the butterflies. I used foam squares to pop up the butterflies for an bit of dimension on an otherwise  one layered card.
Thanks for dropping by my blog and have a wonderful day!
Teresa
PS I also entered this card in CAS-UAL FRIDAY'S Challenge which is CFC62: Create a Clean And Simple card using a black card base. Visit their CAS-UAL Fridays blog and see the inspirtation the Girl Fridays created: http://cas-ualfridays.blogspot.com/2012/07/cfc62.html
Thanks Angie for suggesting that I enter my card in this challenge.

Wednesday, July 18, 2012

Sing Your Own Song

Today I was able to sneak in a card before I had to make dinner. The guys have been working hard on our fence the last two days and work late into the evening so dinner has been later then usual and gave me a little extra crafty time.
Here is my quick card:
I am entering this card in the Stamp It! Cards Birthday Challenge in the Moxie Fab World ( http://www.moxiefabworld.com/2012/06/stamp-it-cards-week-birthday-card.html )
 All you have to do is create a birthday card in which stamping is the primary technique.
The sketch I used is one I have made before and really liked it. You can find it here: http://www.mftstamps.com/blog/?p=9760
You can find the card I made earlier with this sketch here http://teresazuehls.blogspot.com/2012/04/special-wishes.html
The border is made with Fiskars scalloped border punch and I ran the pattern paper through a happy birthday embossing folder. I love the look of embossed pattern paper and is a great way to change its look.
 For my main element I used a Spellbinders die to cut and emboss white cardstock. Next I used one of my favorite inking techniques...resist. I stamped the bird image with Versa Mark watermark ink and used white embossing powder (you can also use clear EP but sometimes I like to use the white as it seems to stand out a bit more) to emboss the image. Next comes the fun part. I started out first with Spun Sugar Distress ink, then Worn Lipstick, then Spiced Marmalade around the outer edges. I used Worn Lipstick again on the very edge.
I then spritzed the whole thing with Perfect Pearls to give it an over all shine. After it was completely dried I stamped the sentiment "It's your day" with Memento Tuxedo Black ink and used foam pop up squares to mount it to the card.
 It is so hard to caputure the shine on camera but in real life it so pretty.
Thanks for taking the time to stop by and I hope you enjoyed your visit.
Teresa

Life is About Who You Love

For my card today I used this darling sketch from Sweet Sunday Sketch Challenge:

Check out the details at Karen's blog http://kgiron.blogspot.com/2012/07/sweet-sunday-sketch-challenge-163.html She also makes the most amazing cards! Every card is embellished with her mad sewing skills. 
 For my card I used this little 6x6 paper pack from Studio 18. This is one out of three different packs and they all have this bright and fun retro vibe about them.
 And now for my card:
I was happy how this card came together so quickly.
For the main focal element I just cut it out and popped it up with foam squares and adhered it to the white cardstock that I embossed using the Swiss Dot EF (I don't think I can make a card without using it).  I punched a label and stamped "friend" and put it along the side.
 For the border I again cut a border from the paper and matted it with orange and white cardstock, layered the vertical element over it and layered the Simple Chartreuse ribbon (Papertrey Ink) on top.
 I layered two flowers together and I just had to add a bit of bling to the card so I put a glittered flower in the center to finish off the flower.
 Oh, and by the way the embossed background is one of the two new EF I picked up at Joann's yesterday. This one is called Palm Leaves. I really like how it looks. It also came with a border embossing folder too.
Hope you give this sketch a try because I think you will really like how easy it is to work with.

Have a wonderful day!

Teresa

Tuesday, July 17, 2012

Hooked on Hexagons

Today's card is for two challenges: Hooked On Hexagons at Moxie Fab World and Retro Sketches.
The Hooked on Hexagon challenge is to create a paper crafted project (card, gift bag, tag, layout, home decor item, mini-book cover, etc.) that incorporates hexagons in an innovative way. http://www.moxiefabworld.com/2012/07/hooked-on-hexagons-challenge.html  You really should check out the challenge as Cath has provided us with tons of beautiful and inspiring photos.
The second challenge is a sketch  from Retro Sketches http://retrosketches.blogspot.com/2012/07/retrosketches-20.html 
 Here is the awesome sketch:
This is my first time playing at Retro Sketches. I have been a bit intimidated by the sketches since I am more of a CAS girl but this week I took the plunge.
Here is what I came up with when I combined the two challenges:
 To be honest I don't know if I am pleased with how it turned out or not. One minute I love it and the next I'm not so sure and think maybe I over did it with embellishments. I made a few changes to the sketch because the vertical element that I used on my card is so much taller than on the sketch
The pattern papers I used are from this 6x6 paper pack from Paula Deen. Ha! I guess everyone is getting in on  paper crafting world! Found it in the dollar section at Michael's for $1.50.
They also had matching tags to go with the papers. And if I had looked at the tags before I started my card I could have used the tag that would have been more of the correct size for the vertical element. Next time I'll know better.

I was pleased with the way my cluster of embellies turned out but again I'm not sure if I over did it. The first time I thought I was done I decided it needed a butterfly. So I punched, embossed and inked a pale yellow butterfly and added it to the top of the cluster.
Then I wanted to add the word Celebrate on a mini tag and place it along the bottom of the flower but the tag covered up too much of the butterfly embossed hexagon. So I went to plan B and placed it at the top right side of the vertical element.
I decided to use the Swiss Dot embossing folder on the vertical element, butterfly and the smallest hexagon. I used a butterfly embossing folder on the medium brown cardstock hexagon and I spritzed it with perfect pearls.
The hexagon punches are Creative Memories and the butterfly and both leaf branches are Martha Stewart. I inked the edges of the two pattern paper hexagons. I used three different sized peals: a large one for the center of the flower, a tiny one on the wing of the embossed butterfly hexagon and the three at the bottom left corner are medium size.
I thought I would ask my you, my blog friends, if you think I over did it on the embellishments or if it is just right. I would appreciate your input as I said before I am more of a CAS type of gal.
Thanks!
Teresa

Monday, July 16, 2012

Tea For Two

Today's card was made with a sketch from Clean and Simple Stamping and here is the sketch:
 Check out their website to see how others interpreted the sketch: http://cleanandsimplestamping.blogspot.com/2012/07/199.html
And here is my take on the sketch:
I don't think you can get much more simpler than this card. All that was used was stamps and paper but I love the way it turned out.
 The stamps and die are from Papertrey Ink, "Tea For Two" and I used Concord Grape, Peeled Paint and Faded Jeans Distress Inks. I was just going to use the white card base for the background but it seemed a little too plain. I started to play around with different colors and finally decided on the dark brown.
The brown really makes the cups pop. The sentiment is stamps on white cardstock with black ink then the ends trimmed in a v shape.
And that's it! No foam dots, inked edges and I even refrained from using perfect pearls on the cups because I  didn't want the card to be too girly.
Wishing everyone a great week!
Teresa

Sunday, July 15, 2012

{Creepy Lane}

I'm still being inspired by the Halloween papers that are sitting out on my desk and couldn't resist making another card using this Mojo Monday Sketch:
 I'm cutting it close to enter...only 4 hours left. If you would like to see more inspiration for the sketch you can see it all here: http://mojomonday.blogspot.com/2012/07/mojo-monday-249.html
Here is my little creation:

 I had such fun making my focal point. I just kept coming up with things I could add to the creepy little scene.
 I started with the wrought iron fence stamp which is from Inkadinkado. I stamped it on white CS using Versa Mark watermark ink then embossed it with black sparkle embossing powder. I used Peeled Paint Distress ink for grass on the bottom and then inked the entire white CS with Pumice Stone Distress ink. The edges are inked with Black Soot then deciding it wouldn't show up against the black mat I inked the edges with white ink from Color Box. I also inked the black CS mat with  white ink.

 I used a Creative Memories punch for the ghost, black cat and pumpkin. I inked all of the edges with black or white ink and added eyes and mouth to the ghost. The Happy Halloween sentiment is stamped onto black CS with Versa Mark watermark ink and embossed with white embossing powder. I decided a big yellow moon would add a nice touch and used the 1 1/2" circle punch from Creative Memories to punch the circle then put it halfway in the punch and punched it again to make it a crescent moon. I layered the sentiment banner over the moon and decided to add the ghost to the banner.
 I used foam adhesive on the pumpkin and the cat on the fence. I found the yellow gemstone star that has been stuck on my desk from a project several weeks ago and decided it would be the perfect finishing touch to the spooky little scene. I thought about trying to find another star but decided that it might be too much and the one star would be enough.
I know I am a bit early with the Halloween cards but I enjoy making them and several have left comments that Halloween is their favorite holiday to make cards for.
What is your favorite holiday to create cards for?
Teresa

Saturday, July 14, 2012

Magic Potion

I used this weeks sketch over at The Deconstructed Jen's for the card I am sharing with you today. It's been awhile since I've used a Deconstructed Sketch . I enjoyed playing along and seeing how others interpreted the sketch. 
Here is Jen's sketch;
 Jen has such creative sketches that makes you think out side of the box at times.
Here is what I created with the Deconstructed Sketch #60:

I had been going through some Halloween papers and had just seen a tag that was already punched and I thought to myself I need to use this, as it was made with some of my favorite pattern paper. So when I saw this sketch and I knew the two were meant for each other. I had to change the sketch from a square card to an A2 size so my card looks a bit different.
All the stamps are Studio G dollar stamps. I used Memento Tuxedo Black ink  on white CS and embossed with black embossing powder on the Magic Potion image. After cutting the image out I used Pumice Stone distress ink to color the image making the edges darker.
The Happy Halloween sentiment is stamped with the same ink but not embossed. I used a light gray CS and inked the edges with Black Soot Distress ink. I then inked the edges of all pieces of paper before adhering it altogether. I added the orange and purple gemstones to balance out the left side of the card and added ribbon and twine to the tag.

Hope you enjoyed my card and give the sketch a try over at Deconstructed  Sketches http://deconstructingjen.com/archives/6157

Teresa

Friday, July 13, 2012

Blue Floral Set

Yesterday I posted a card I made using a Freshly Made Sketch you can see the post here: http://teresazuehls.blogspot.com/2012/07/blue-floral-happy-birthday.html
Now here are the rest of the cards I made to make a set of eight note cards. I made two of each design and I used the same sketch for each card just changed up the stamps, sentiments etc.
First one  is a thank you card.

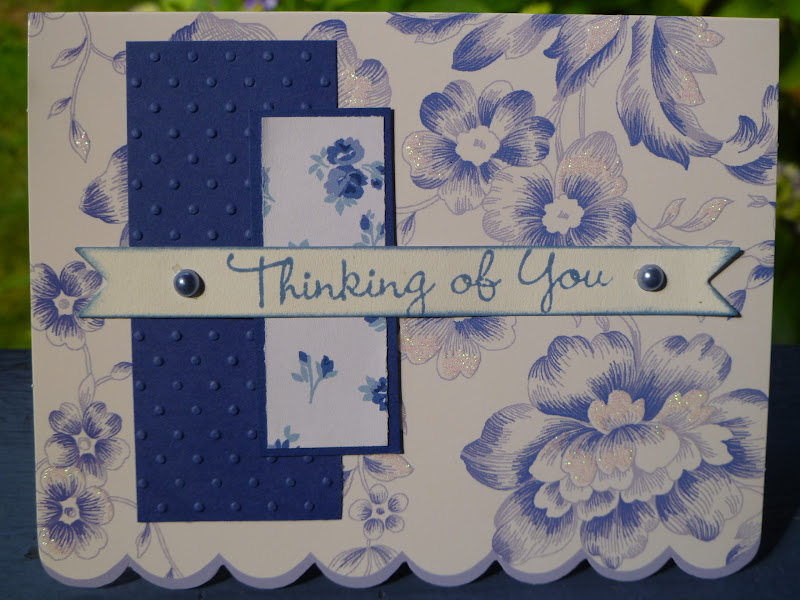
 I don't know the manufacturer of the flower stamp set. It might be Martha Stewart but I am not sure. I have had this set for several years and never used it but the packaging looks like it might have been a MS set. Any how I though the stamps matched the flowers on the card pretty well.
 I used Faded Jeans distress ink and for the get well sentiment I used Versa Mark watermark ink with white embossing powder.
 I just love the sparkle on the flowers. I think you can see the glitter really well in this photo.
 To get better ink coverage on the large flower stamp I first stamped my flower stamp in Versa Mark  watermark ink then in Faded Jeans distress ink then stamped the image in white paper.
 The "thinking of you" is the last of the set. I even emossed the flap of the envelopes with the Swiss Dots embossing folder and stamped a small flower on the front.
Enjoy!
Teresa