Showing posts with label Cards for the Troops. Show all posts

Saturday, October 6, 2012

Christmas & Birthday cards

Here are just a couple more cards that I made to send to the troops.
 
 Both these card designs were made from previous Freshly Made Sketches:
 FLT123
FLT116
My favorite sketch is FLT123 I made several different cards using that sketch. It was such a fun and easy sketch to use.


I love the ornaments on this card. I stamped them first on the white cardstock with black ink and embossed using black sparkle embossing powder then I stamped them again on white cardstock and colored the ornaments with distress markers then cut them out and glued them over the other embossed ornaments. I like how it gives more dimension to the ornaments and you can actually see the sparkle from the embossing powder in the photo. It is so hard sometimes to capture that in photos but I guess the lighting was just right at the time I took the photos.

Thanks for visiting my humble little blog and have a great weekend!

Teresa

Monday, October 1, 2012

A Merry Monday

As I was looking at some of my favorite blogs I came across this sketch challenge on Lisa's blog, Snowy Moose Creations:
Even though I was too late to enter the Merry Monday Challenge I thought it was a great sketch to make a Christmas card for the troops.
Here is the fun card I came up with using this sketch:

I used a  snowflake Cuttlebug embossing folder on the card base and Spellbinders Nestabilities to cut out the pattern paper and white cardstock.
The ribbon is from Papertrey Ink and the snowman image and snowflakes are from Stephanie Barnards Stamps of Life. The senitment is also from Papertrey Ink. On the snowman I used VersaMark watermark ink and used sparkel black embossing powder. The snowflakes were stamped with Tumbled Glass Distress ink and the sentiment was stamped using Memento Tuxedo black ink.
I used kraft colored cardstock to help tie in with the pattern paper and inked the edges with Fired Brick distress ink.
 
Now I am off to make some more zucchini bread. Our neighbor was so kind to give us a couple of big zucchinis so I thought I would make them a loaf to thank them.  
Teresa
 

Sunday, September 30, 2012

Merry Christmas and Ornaments Cards

I was busy last week coming up with card designs for our upcoming Card Workshop for the Troops. We will be making Christmas cards along with all occasion cards for this batch.
Here are a couple of cards that I have taken the time to photograph:
 
 After embossing the white cardstock I used the Christmas distress inks that came out last year to color it. The colors are Festive Berries, Iced Spruce and Evergreen Bough. I then spritzed the embossed and inked cardstock with Perfect Pearls.
 The stamps are Recollections Merry Christmas. I first inked the stamps with VersaMark Watermark ink then inked it in Iced Spruce and embossed it using clear embossing powder. Using the Watermark ink with the distress ink gives a crisper image if you don't want a distressed look.
I have a ton more cards to share just need to get them photographed and up on the blog. I should do it today as it is nice and sunny.

Hope everyone is having a relaxing Sunday with the family.

Teresa

Tuesday, May 1, 2012

Last of the Patriotic Cards

I now have twenty two 4th of July/Patriotic cards to send to our troops overseas! Here are the last two cards I made:
First card is from sketch #155 from Unscripted Sketches:
This is really a fun and easy sketch to use. Click here and check out how their design team used the sketch: http://unscriptedsketches.com/2012/04/unscripted-sketches-155/
Here is my card:
 The background is embossed with the star and dotted swiss Cuttlebug embossing folders. I stamped the star image over Hero Arts Envelope Pattern. Both were inked with Fired Brick distress ink.
 I wrapped the gold thread under the stamped star and tied it. I used a gold star gemstone on the small blue square.
The sentiment was stamped with Watermark VersaMark ink and embossed with white embossing powder.
And here is the last of my patriotic cards:
 The red cardstock is embossed with the star embossing folder and the blue cardstock is embossed with the swiss dot folder. The three small stars were punched out of leftover white cardstock that had been stamped with the Envelope Pattern from the card above. I inked the edges with Fired Brick distress ink.
 I wrapped the cardstock with red and white bakers twine and tied a bow. I stamped the two sentiments on white cardstock with Memento Tuxedo Black ink. I used a gold star gemstone on the 4th of July sentiment.
Taking a break from cards for a day or two and will have something else to share with you all tomorrow.
Teresa


Monday, April 30, 2012

Trio of Patriotic Cards

For my first card I used this fun sketch from The Deconstructed Sketch #49:
Go here to see what others have done with this sketch: http://deconstructingjen.com/archives/5846
Here is how I used the sketch:
 I used the star embossing folder and misted it with Gold Perfect Pearls instead of the Pearl Perfect Pearls. I've had this corrugated cardboard forever and thought it would add some fun texture. After trimming the ends of the cardboard I inked it with Fired Brick distress ink then layered the rest of the shapes on top. The top mat is die cut from a Spellbinders die and added the gold pearls. The stars are leftover from a project I did a long time ago and were the perfect size.
 For the sentiment I used the light blue cardstock and used Watermark VersaMark ink with white embossing powder.
Up next is a card I made from sketch#FTL188 found at Clean and Simple Stamping: http://cleanandsimplestamping.blogspot.com/2012/04/188.html Visit them to see many inspiring projects using this cute sketch.
Here is the sketch:
Cute isn't it?
Now here is the card I created with the sketch:
 I am pleased with how this card turned out. It might have to do with the fact it has a bit of glitter. I again used the star embossing folder and gold Perfect Pearls. Stamped the image with Memento Tuxedo ink then I colored it with Red and Clear Glaze Pens.
 Can you see how the glaze pens add shine in the photo? They also add just a hint of dimension without the bulk. So fun and easy to use.
 Again I used Watermark VersaMark ink to stamp the sentiment then used white embossing powder.
For my third and final card of the day I used this simple sketch #263 from CPS:
 See how the sketch was used by visiting here: 
http://cardpositioningsystems.blogspot.com/  This week CPS is being sponsored by Skipping Stones.
Here is what I created using the sketch:
 Once again I embossed the white cardstock with the Cuttlebug star embossing folder but this time I wanted a distressed look so I used the blending tool with Fired Brick distress ink and lightly ran it across the top of the embossed paper. Then I did the same thing with Vintage Photo. I used a distress tool on the edges and then inked the edges with Vintage Photo.
 I stamped the image on white cardstock and colored it with Glaze pens. I inked it with Fired Brick and Vintage Photo Distress ink to age it. Then I was in a dilemma. I needed to do something with the two end pieces. They were just sitting there blank. I couldn't think of a thing to do that would look right. I wanted to emboss them but I thought they would look out of place with out the middle block embossed too but I had already adhered the stamped image to the navy cardstock. Finally I decided just to go ahead and emboss all three pieces and hope that the ink from the Glaze pen would not crack when it was embossed.
 The ink held up and the image looks really cool embossed. Problem solved! I just rounded the outside corners and was done. I left off any sentiment that way it can be used just as a note card or even for someone whose birthday falls on July 4th.
I am only about two cards short of having 20 patriotic cards to send to From Our Hearts for our troops overseas. I can't believe I have made so many different using pretty much the same supplies and the same colors of cardstock. Although I must admit I am getting a little tired of red, white and blue ;). Thanks to all the great sketches I have used each card is unique and kept my mojo going.
Have a great week!
Teresa


Tuesday, April 17, 2012

A Card With A View

A new challenge is up at A Blog Named Hero! The challenge is called A Card With A View. All you have to do is create a card with a window. Check it out for yourself by using this link: http://ablognamedhero.blogspot.com/2012/04/challenge-2-cards-with-view.html  
Hereis the challenge:
Here is what I came up with:
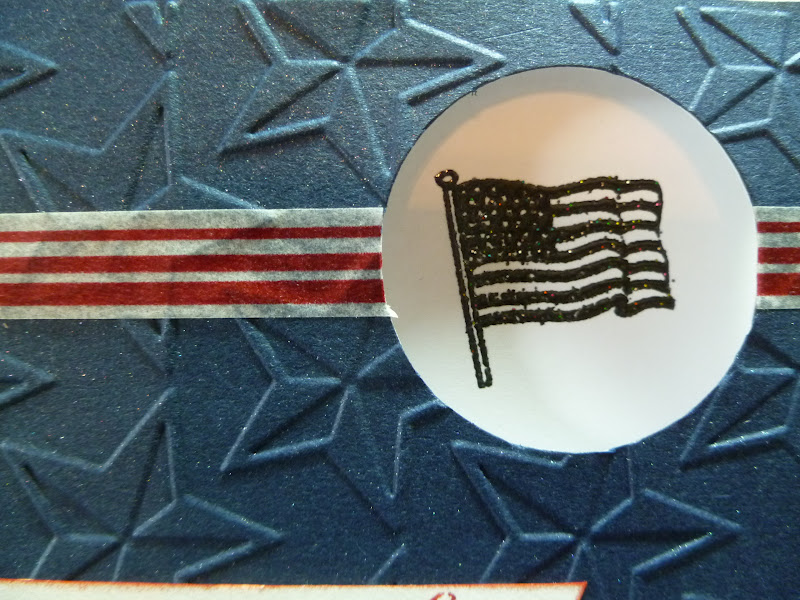
I started with my background which is simple navy blue cardstock that I embossed with an embossing folder then spritzed it with Perfect Pearls. I then used a circle die to cut my "window".  I stamped the flag image on the insdide of the card with VersaMark Ink and used Black Sparkel embossing powder.
I had stopped at Michael's yesterday and bought some Michael's brand Washi tape. They call it Craft tape. It was on sale so I thought it was a good time to try it out. Also they had it in red, white and blue and I knew I was going to be making 4th of July cards for the troops. So I pulled the tape out and picked out the red & white striped tape. After I had put the tape on my card I realized the embossing showed through the tape. I should have put the tape on cardstock before I adhered it to my card. I also meant to put a red border around the opening of the window but forgot.
 Onto the sentiment. I used three stamps to make the sentiment. The one stamp with the stars actually  says 4th of July but I wanted I wanted it to say Happy 4th of July so I used the word happy from a Happy Birthday stamp by just inking Happy and I just inked the stars and "4th of " on the other stamp. I had a July stamp that was bigger so I combined it with the "4th of July"  and cut the white cardstock into a banner and inked the edges with Fired Brick Distress ink. I put gemstones under July and then adhered the word Happy with foam dots .
I decided to make another card the way I had intended to. Here it is with the red frame around the window:
 And also with a strip of white cardstock under the craft tape. It looks much better.
 On the back side of the window I adhered another frame so it would looked finished.
I also was able to add a red frame to the window on my first card and I like it a lot better too. Just couldn't change the craft tape.
Hope everyone is having a creative week.

Wednesday, March 21, 2012

Card Workshop for the Troops

We held our third card workshop for the Troops last Tuesday. We had eight ladies come and make Mother's and Father's day cards along with many different everyday cards.
We also decided we needed a name for our group and came up with this: Operation Kitsap Kards

Here is a small sample of some of the cards we made:
 The cards are in clear envelopes ready to be mailed off to From Our Hearts who will then sort the cards and mail them out to our troops who very much appreciate the handmade cards.
We sent a total of 133 cards this time. Whoo hoo! Thanks ladies for all of your hard work, time and talent.
If anyone is interested in making cards for the troops just leave a comment with your info and I will let you know when our next workshop will be. Right now we are planning for the next one to be in July and the holidays we will be making cards for will be Halloween, Thanksgiving and fall.

Or if you would like to plan your own cardmaking event just go to From Our Hearts website: http://www.fromourhearts.info/  and you will find all the information you need on the right sidebar. They also have the schedule for when each holiday needs to be shipped to them.

Right now they are in need of everyday cards like thinking of you, missing you, birthday cards for both adults and kids etc. and they are always in need of masculine cards of every type. 

Note to self: Remember to take photos during the workshop! I have meant to do that the last two times and I always forget until its over.

I will post the cards that I made in another post.

Tuesday, December 6, 2011

Valentine Workshop for the Troops


Today we held our second card making workshop for the Troops. It was a good time with paper, glue and scissors moving at warp speed as we each made two cards from eight designs so we each ended up with sixteen cards. We had plenty of warm beverages and sweet treats to keep us going.

Thanks to all you ladies that shared your time and talent! We even had two gals that had never made a card and their cards turned out fabulous.

For those who weren't able to finish your cards here are the samples of each card as a guide. (Except for card 5 which is missing. I will post it as soon as I find it or make another one.)


Card 1


Card 2


Card 3


Card 4


Card 5 (I found it)


Card 6


Card 7


Card 8

If anyone is interested in making cards for the troops to send home to their family and friends you can leave a message in my comments and I will get let you know when our next workshop will be. Or you can visit From Our Hearts blog http://www.fromourhearts.info/ and send your cards directly to them.

I will be posting photos of  some of the cards the others made next week.

Saturday, September 24, 2011

From Our Hearts

I want to share what our small group of ladies did this week. The six of us got together on Tuesday morning and made cards for our troops for a non-profit organization called From Our Hearts.
Here are some of the cards we made:


We had a wonderful time stamping, cutting and putting cards together We only made 20 some cards that morning but we kept on making cards on our own at home and at the end of the week Jennie and I had collected 80 cards.

For each we card we made we put it with an envelope and put both in a clear envelope and inserted a slip with our name and From Our Hearts information so that when a soldier picks a card they will know where they came from.


 We made Thanksgiving, Christmas, Hanukka, birthday, hello, thinking of you, just because and thank you cards. We separated the cards in groups by the type of card and filled out an inventory sheet  so when From Our Hearts receives the box they know how many of each type of card as well as the total.


We also put in packs of pens to send along with the cards so when the soldiers want to send a card they will also have a pen to write their message.

Once the cards reach From Our Hearts they regroup the cards so each box they send has a good selection of different types of cards before sending the cards on to our troops that are overseas and far away from there families and friends. I encourage you to visit their website to read what all these ladies do for our troops. If your are interested in making and sending cards go to the right side bar of their website under FAQ to learn more and to answer any questions you might have.


These photos are just a small sample of the cards we sent. We are planning on doing this again the first part of December to send Valentine cards to the troops as well as everyday cards. So if you live in the Silverdale, WA area and would like to make some cards for the troops with us please leave a comment with your email address and I will give you more information.  Or you can go to From Our Hearts website and send them directly to them. It doesn't matter if you have never made cards just come and we will have some thing for you to do. We would like to make 100 cards next time.