Showing posts with label A Blog Named Hero Challenge. Show all posts

Wednesday, September 25, 2013

Note Card Set

Hello! Been having issues with my blog. It won't let me post and a few other things. Any way here is a set of note cards that I made to put in a tea basket that I am making up for a fundraiser. 
I used this sketch from Seize the Sketch
The stamps and dies are all Papertrey Ink. I used Picked Raspberry Distress Ink on this card. The cards are all alike. I just changed the color on each card.
I used Spiced Marmalade DI on the tea cup on this card. The white cardstock was embossed with a Cuttlebug embossing folder.
Dusty Concord DI was used on this teacup. I also distressed the edges of the black cardstock

Peeled Paint DI was used on this teacup and I cut up gemstone flourishes to use as the steam on each cup. I have been hoarding these flourishes for a long time waiting for the perfect project to use them on.
I am also entering this card set int the A Blog Named Hero's Game. Match. Set. Challenge
Well I hope my blog will continue to work. Keeping my fingers crossed.

Teresa


Saturday, September 7, 2013

Bundle of Joy

Good morning and I hope your weekend is off to a good start!
It is rare that I need a baby card but my husbands nephew and wife just had a sweet baby girl.
Here is what I came up with:
 For the design of the card I used the Deconstructed Sketch #117
 
I really love how the left corners are rounded. The only change I made was I just moved the wide border strip over to the very left side edge of the card and made it a bit narrower.
When I came across the inspiration photo for ColourQ's # 205 Challenge for this week I fell in love with those boots!
I think the colors made for a sweet baby card too. For Island Indigo I used Ocean Depth Versa Magic ink, Picked Raspberry Distress ink for Raspberry Ripple and Spun Sugar DI for Regal Rose.
 I just love the bit of ribbon sticking out from the button that I threaded twine from The Twinery through. I just can't seem to leave empty holes in buttons.
And since I used a button I am also entering this card in the A Blog Named Hero Button It Challenge #31

All you have to do is add one button or as many as you would like to your new project or card.
 The booties are the only baby stamp I have so I pulled it out and inked it up with VersaMark watermark ink then with Picked Raspberry and embossed it with clear embossing powder. I stamped it on white cardstock and colored the booties in with Spun Sugar and a bit of Picked Raspberry before cutting them out.
The pattern paper and cardstock is all from Creative Memories and so is the scalloped border. I wrapped a bit more twine from The Twinery around the border to give it a more finished look. I embossed the light pink cardstock with a Cuttlebug embossing folder and sprayed it with Perfect Pearls for a little sparkle.
I did have to piece together the sentiment from three different stamp sets. The "congratulations " so from an Hero Arts set and the "On Your" is from PTI's Tea for Two Additions and the Bundle of Joy is from PTI's Mega Mixed Messages. The latter is my go to stamp set. I use it so much. I thought about just using the computer to type out the sentiment but I wanted to use the Ocean Depth ink instead of black for a softer look.
Well, there you have it! My baby card for the year. I think I really should invest in a stamp set for babies. Any suggestions?

Teresa

Sunday, August 25, 2013

Wishing You

So how was your weekend? Ours was very nice. Had a cook out on Saturday for some friends and had a nice visit with them.
Today after doing a bit of cleaning up from last night I was able to get in some crafty time so I have a card  to share with you tonight.
 Viva La Verve Sketch Challenge AUG Week 4 was used for the design
 I decided to flip the sketch on it's side just because. ;)
The colors of the card came from the fabulous inspiration photo at Moxie Fab World's Tuesday Trigger:
Isn't that cup and saucer delightful! I was so hoping that I would have time to play along this week because I just love all those beautiful colors of the flowers and saucer.
I wanted to capture the translucent color of the saucer.The only way I could think of getting that look was by  using vellum. I inked a piece of vellum with Tumbled Glass distress inks and inking tool and adhered it to white cardstock before running  both through the Cuttlebug with an embossing folder. It is really hard to capture the color of the vellum with the camera. It is so very pale.
 It took me a while to figure out what colors to use for what elements. I had so many options but I eventually worked it out. The papers are from DCWV Matstack Citrus. I love how subtle some of the pattern paper is from that stack.
 
The flower stamp is from an Heidi Grace set called Paradise. I stamped it with StazOn, Blazing Red ink and cut it out adhering it with a pop up dot. The sentiment is from the Verve stamp set "Wishing You". I backed all the elements with red pattern paper to help each one stand out a bit more.
And since I used vellum I thought I might as well enter this card in A Blog Named Hero's #30 Victorious Vellum Challenge:

All you need to do is use vellum on your project. Stop by their blog and check out the amazing  projects of their Design Team. You will be wowed!

Thanks for dropping by.

Teresa


Friday, July 5, 2013

Horse'n Around

Happy Friday! I'm sure many here in the US are enjoying a long weekend since the 4th was yesterday so I hope you are having a wonderful time.
I have been working on this card that I'm sharing today for three days and finally finished it yesterday morning! I had a crazy idea to use my horse stamp to go with the Mojo Monday sketch even though most  went with flowers and ribbon. It is for my sister's birthday and she, like myself loves horses.
My sister isn't a girly girl but I still wanted it to be a little on the feminine side and is where the problem was. I seriously was wondering whether it was going to work or not until I found the right pattern paper.
Here is my card:
Here is the lovely Mojo Monday Sketch Challenge #300
They are celebrating their 300th challenge over at Mojo Monday so if you have time you should check out what all is going on over there. Fun times for sure!
I am also entering this card for the current challenge, Playing Favorites over at A Blog Named Hero.
It's pretty simple just use your favorite HA stamp or product on a new card or project. I used a favorite stamp from HA, which was this horse stamp:
It is old but I had just pulled it out last month and have been using it again. I really do enjoy taking something that I haven't used in forever and make it new again by applying new papers and techniques which make me fall in love with it again.
Here is the other birthday card I made with the same stamp if you would like to see it. It's funny because I also used a Mojo Monday sketch to create it too.
 I didn't want to go with brown for the barn shutter so instead I stamped the stalls Barn Door and used clear embossing ink before inking them with worn lipstick. I then inked the outside with Walnut Stain to tone down the red.
The horse is stamped with Timber Brown Memento ink and clear embossing powder. I then used Antique Linen distress ink & Vintage brown which I stamped on my craft mat and spritzed each color with water before coloring the horse image.
 There was a hook that was where the brad is holding the rope. I cut it off and used the brad instead. The dark brown banner or flag, whichever way you prefer to call it, was dry embossed using wood grain embossing folder. I fussy cut the rope and stamped the image onto white cardstock using Walnut Stain Distress ink.
 I stamped "For my- sister" on the background paper with Timber Brown Memento Ink.I used a brad for the dot on the i in Sister. I decided to add a couple of wraps of jute at the top of the banner to help balance out the card.
I added 3 brads in the upper left corner and did pen stitching around the entire card. I decided the background was too plain so I grabbed my cuttlebug and my brand new never before used  Chicken Wire embossing folder.
Look at all that detail. The dry embossing really added a lot to the card.
Well, that's it for this post. Not sure that I'm thrilled with the way this card turned out but it's done.
Have a good day!

Teresa


Sunday, June 23, 2013

Friend, Celebrate Today!

Hello! 
It's the end of the weekend a brand new week is just ahead and I have a new card to share today. For this card I used this sketch from Seize The Birthday
This is my first time over at Seize the Birthday so if it's new to you too go over and check it out.
Now here is my card:

 After I finished the background I made the tag. I have a ton of these foam hearts in pinks, red and white. I grabbed the smallest white heart that was glittered and inked the edges with Fired Brick distress ink and  also the edges of the tag. I added the red gemstone to the heart and there was a small red banner scrap laying on my desk that I incorporated into the card by inking the edges with Black Soot distress ink and stamping "friend " in Tuxedo Black Memento Ink. I also stamped the sentiment, Celebrate Today in black onto the label and tied on the ribbon to finish the tag. I adhered the tag to the card with pop up dots.
 Here is a close up of the heart. It has a nice sparkle to it.
 
Just before I took these photos I decided to add three clear gemstones to the flowers on the pattern paper but changed them out for pearls which I think looks better.
 Here you can see the dimension of the tag and pearls.
I think I will also enter this in the tag challenge over at A Blog Named Hero where you need to use a tag on your card or project.
Thanks for the visit and I hope you come back soon!

Teresa


Thursday, June 20, 2013

Smile

Good morning! 
I whipped up this little card late last night...
...and I used this pretty little sketch from Deconstructed Sketches #105
 
It all started with this darling little beehive tag. I went with the colors on the tag then opened my trusty scrapbox to see if I could find some circles and I hit the jackpot. I found both the white and yellow circle that fit together and I just adhered them together and ran them through the Cuttlebug with my favorite Swiss Dot embossing  folder. The tag already had a pop up dot on it so I just adhered it to my circle mat added a baker's twine bow from the Twinery and a gemstone to the center of the bow.
 I  rummaged through my white scrap paper and found this cute scalloped border with tiny hearts in the center of each scallop and paired it with the yellow paper which I also embossed with a different embossing folder.
I used a light brown for the banner behind the circle. The banner looked a little plain so I did what I always do when something needs a little pick me up, I inked the edges with Walnut Stain distress ink. That inking and pop up dots did the trick.
I added the "Smile" sentiment at the bottom of the circle instead of by the baker's twine at the top. It just seemed to fit better and I tied the baker's twine in a knot verses a bow. A bow seemed to compete with the bow on the tag.
 Besides entering this card in the Deconstructed Sketch #105 but also the A Blog Named Hero Challenge #26 where you have to use a tag and the The Twinery's Anything Goes Twine Madness Challenge where you can use twine however you like.
So there you have it. Now I'm off to enjoy the day and I hope you do too!

Teresa

Thursday, June 13, 2013

Sailboat and Flourish Tree

Hello! 
A friend called on me to make a few cards for her this weekend and I am done. The first card is one of two Father's Day cards she needed and has a nautical theme which really seems popular right now.
I realized that I really need some nautical themed pattern paper but I was able to make do with what I had on hand. I used this Mojo Monday Sketch
These colors were challenging for sure but it is fun to try out new color schemes and break out from the same old ones I use over and over.

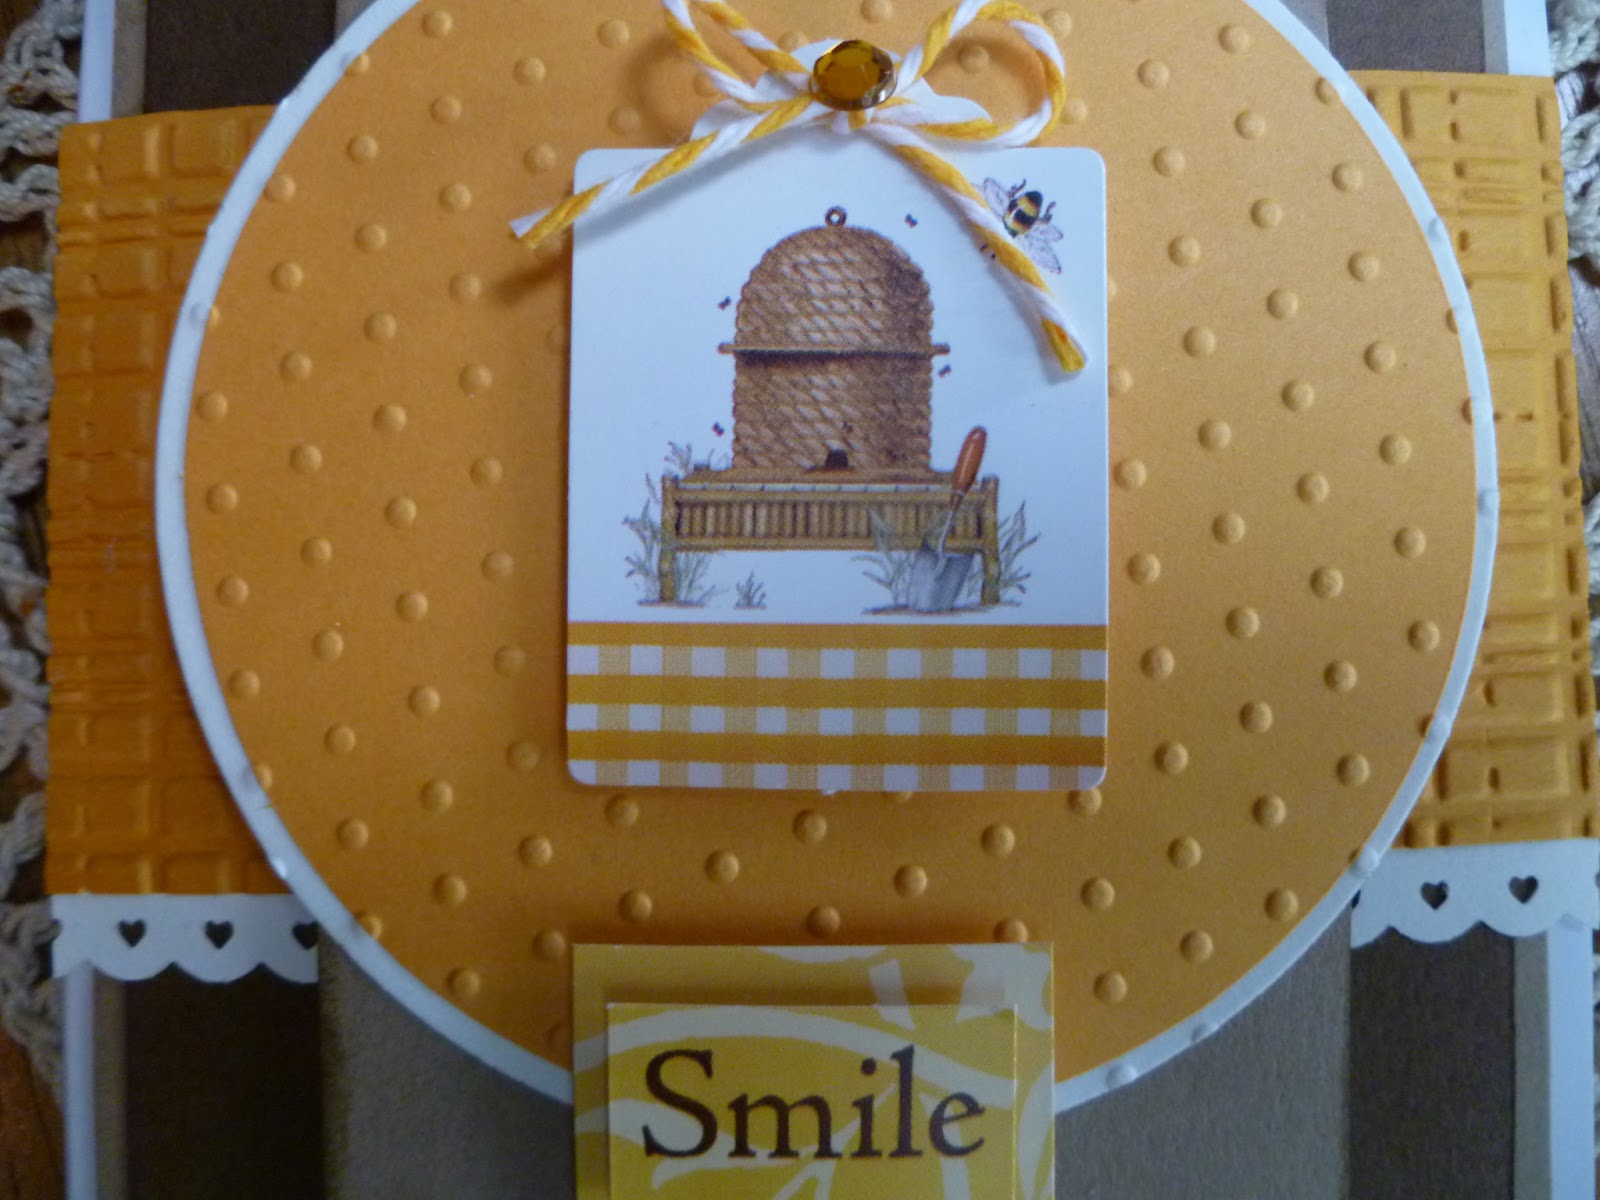
For my focal image I used a little boat stamp from Hero Arts and paired it with a wave stamp from Raindrops on Roses (I don't think they are in business any longer) and I encircled it with an image from my new Verve stamp set "Strong Anchor" inked in Tumbled Glass distress ink. Fired Brick was used for the boat and Ocean Depth chalk ink for the waves.
I used a couple of embossing folders to add texture to the cardstock and added baker's twine from The Twinery along the scalloped edges.The twine seem to blend the edges together. Sometimes I just don't like seams to show and the twine was narrow enough and was another way to add more of the indigo blue color.
 I had to move the sentiment banner to the top instead of below the focal image as in the sketch. It just wouldn't work underneath. I stamped the sentiment, which is from Verve, in Ocean Depth and inked the edges too.
 Here is the inside of the card using leftover scraps off of paper I had to trim down and the ships wheel that I had wanted to go on the front but it didn't work out so I used it inside the card.
 Here is the next card:

 I used this sketch from Retro Sketches

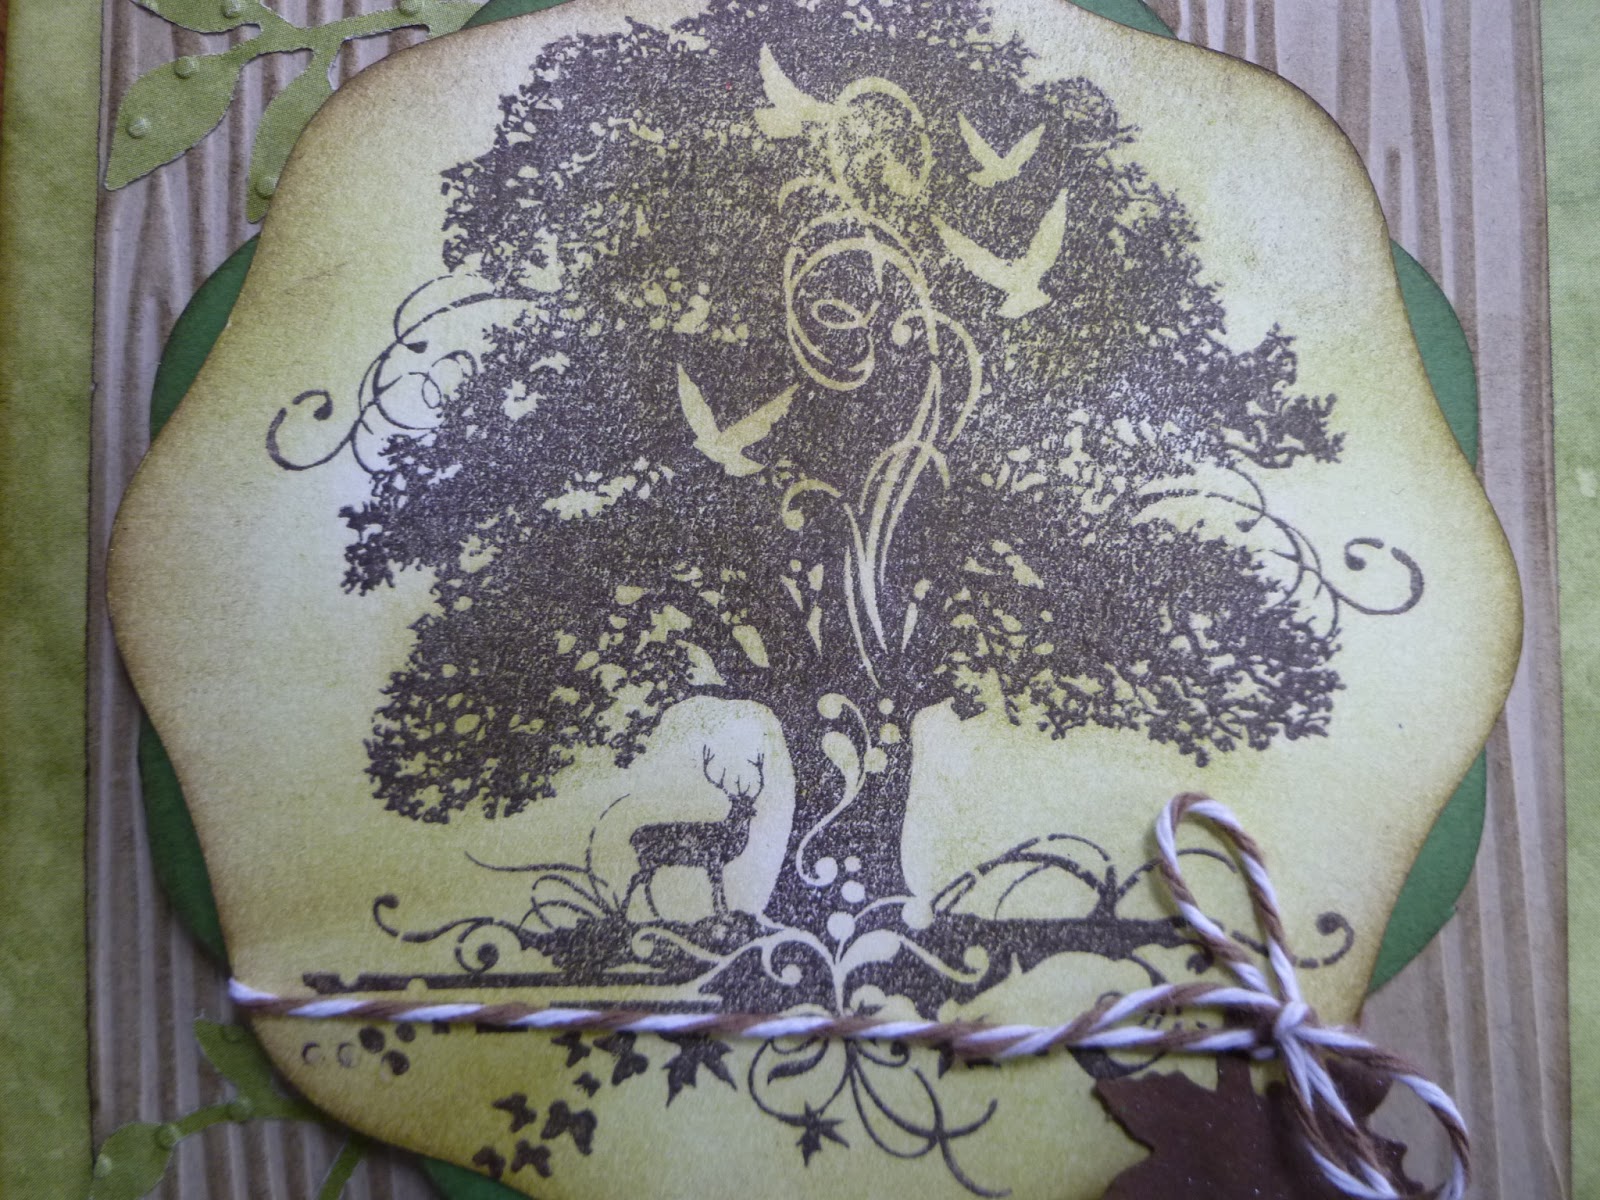
 For the focal image I used this lovely tree image with the dear that I already had in my scrap box all ready to go and I even had the green mat to go with it. So this card came together rather quickly. 
The only thing I had to do to the focal image was ink it with Peeled Paint distress ink and then inked the edges with Walnut Stain.
 I just added the twine from The Twinery around the bottom and glued a maple leaf that I spritzed with Perfect Pearls. The sentiment is the same as on the first card just stamped on kraft CS in Walnut Stain distress ink.
 This photo shows the dimension and the texture from the embossing folders I used on the kraft CS and the leaves. I also inked the kraft CS with Walnut Stain and also the edges of all the papers.
Instead of using the banner in the sketch I thought it would be fun to switch it for leaf branches.
I am also entering both cards in The Twinery's Anything Goes... Twine Madness Challenge and in the  Hero Arts #25 It's a Man's Man's World Challenge.
My, there are a lot of fun challenges out there! So go ahead and check these challenges out. There is still plenty of time to play along if you want to.
If you know of other fun challenges please share them in a comment here. It is always fun to try new challenges.